How to avoid ORA-02153 when creating database links on 11.2.0.4 (the unsupported way)

Disclaimer (wow, most of my recent posts start with a disclaimer, I guess it’s bad): this post explains an UNSUPPORTED workaround for an error enforced by recent Oracle security checks. You should never use it in production! Forewarned is forearmed.

Before Oracle Database 11.2.0.4, it was possible to create a database link using the following syntax:

It was possible to get the password hash by either selecting dbms_metadata.get_ddl for the database link or by querying directly the link$ table.

Starting with Oracle 11.2.0.4, Oracle is enforcing a check that prevents to use such syntax. Every newly created database link must have the password explicitly set.

This is clearly stated in the MOS note:

ORA-02153: Invalid VALUES Password String When Creating a Database Link Using BY VALUES With Obfuscated Password After Upgrade To 11.2.0.4 (Doc ID 1905221.1)

This is seen as a security enhancement. In my opinion, it forces also to specify clear text passwords somewhere in the scripts that create the db links. (You do not create the db links by hand in sql*plus every time you need one.  Do you?)

The only exception is when using the expdp/impdp. If you expdp a schema, the dumpfile contains the password hash and the statement needed to recreate the database link (… identified by values ‘:1’), but Oracle only allows impdp to use such statement.

So, simple workaround, just create the database links on a dev/staging environment, export them using expdp and then provide your dba the dumpfile so he/she can import it and create the dblinks. Right? Not always.

There is one case where you really need of the old syntax.

  • You don’t know the password

AND

  • You MUST change the database link name.

As you may know, there are no ways to change a database link name (even through impdp, there is no remap_dblink or anything like that).

E.g., you need to keep the db link and intend to use it for a check BUT you want to prevent the application from using it with the old name.

Because I believe that no problems exist that cannot be solved by my Trivadis’ colleagues, I’ve checked internally. A colleague came out with a dead simple (and unsupported) solution:

Insert/update sys.link$, flush the shared_pool.

Remember, use it at your own risk (or don’t use it at all) 😉

HTH

Ludovico

ORA-01882: timezone region not found while connecting to an EM12c target

After a recent upgrade to Enterprise Manager 12c 12.1.0.5, we noticed that the few Oracle Databases in release 10g were no more connectable:

ORA-01882On MOS there are a few notes about the error: ORA-00604: error occurred at recursive SQL level 1 ORA-01882: timezone region not found, the most relevant being Doc ID 1513536.1 and Doc ID 1934470.1.

The problem is due to the time zone table on the target database that doesn’t contain the timezone requested by the client. But who’s the client? In our case, all the target agents were correctly set to Europe/Zurich, but the timezone table of the target database contained it:

So what was causing the problem?

The upgrade process of the OMSes from 12.1.0.3 to 12.1.0.5, without the presence of a specific TZ environment variable, set the OMS timezone to Europe/Vaduz. I figured it out after searching deep and large,  inside the WLS product properties:

Indeed, that timezone was not present in the timezone table version 4:

After setting explicitly the TZ to Europe/Zurich on the OMS servers and restarting the OMSes, everything was fine again.

HTH

Ludo

My feedback after upgrading EM12c 12.1.0.3 to 12.1.0.5

Today I’ve upgraded EM12c for a customer from the second-last version (12.1.0.3) to the last one (12.1.0.5) and the EM Repository from 11.2.0.3 to 12.1.0.2.

The upgrade path was not very easy: EM 12.1.0.3 is not compatible with a repository 12.1.0.2 and EM 12.1.0.5 requires a mandatory patch for the repository if 11.2.0.3 (or an upgrade to 11.2.0.4).

So I’ve done:

  • upgrade of the repository from 11.2.0.3 (in Data Guard configuration) to 11.2.0.4
  • upgrade of the EM from 12.1.0.3 to 12.1.0.5
  • upgrade of the repository from 11.2.0.4 to 12.1.0.2 (in Data Guard configuration), from Solaris to Linux


In my case, I was particularly concerned about my customer’s EM topology:

  • two OMS in load balancing
  • console secured with a custom SSL certificate
  • a good amount of targets (more than 800 total targets, more than 500 targets with status)
  • a lot of jobs and custom reports
  • a big, shared central software library
  • many other small customizations: auth, groups, metrics, templates…

I will not bother with the actual execution steps, every installation may differ, I strongly recommend to read the upgrade documentation (I know, it’s HUGE 🙁 ).

Just to resume, the upgrade guide is here: https://docs.oracle.com/cd/E24628_01/upgrade.121/e22625/toc.htm

in my case I had to read carefully the chapters 3, 4, 5, 6 and appendixes G and K.

By following every step carefully, I had no problems at all and at the end everything was working correctly: all the targets up, the load balancing working in SSL as expected, the jobs restarted and ran successfully…

It has been incredible to see how many operations the OUI has done without raising a single error!!

Ok, it’s not just a Click Next Next Next Next installation, there are a lot of steps to do manually before and afterwards, but still… very good impression.

It took a little more than one hour to upgrade the first OMS (this also upgrades the EM repository) and a little less than 20 minutes to upgrade the second one.

Let a couple of hours for checking everything before, staging the binaries, taking backups/snapshots, creating restore points… and one hours more for upgrading the central agents and cleansing the old installations.

About upgrading/moving the repository, check this good post by Maaz AnjumMIGRATE ENTERPRISE MANAGER 12.1.0.4.0 TO A PDB FROM A NON-CDB, even if you don’t plan to do it, it’s worth a read.

HTH

Ludo

It’s confirmed. Standard Edition and Standard Edition One are dead.

The first voices came on July 3rd, 2015.

After many years of existence, Standard Edition and Standard Edition One will no longer be part of the Oracle Database Edition portfolio.

The short history

Standard Edition has been for longtime the “stepbrother” of Enterprise Edition, with less features, no options, but cheaper than EE. I can’t remember when SE has been released. It was before 2000s, I guess.

In 2003, Oracle released 10gR1. Many new features as been released for EE only, but:

– RAC as been included as part of Standard Edition

– Standard Edition One has been released, with an even lower price and “almost” the same features of Standard Edition.

For a few years, customers had the possibility to get huge savings (but many compromises) by choosing the cheaper editions.

SE ONE: just two sockets, but with today’s 18-core processors, the possibility to run Oracle on 36 cores (or more?) for less than 12k of licenses.

SE: up to four sockets and the possibility to run on either 72 core servers or RAC composed by a total of 72 cores (max 4 nodes) for less than the price of a 4-core Enterprise Edition deployement.

In 2014, for the first time, Oracle released a new Database version (12.1.0.2) where  Standard Edition and SE One were not immediately available.

For months, customers asked: “When will the Oracle 12.1.0.2 SE be available?”

Now the big announcement: SE and SE One will no longer exist. With 12.1.0.2, there’s a new Edition: Oracle Database Standard Edition 2.

You can find more information here:


Some highlights

– SE One will no longer exist

– SE is replaced by SE Two that has a limitation of 2 sockets

– SE Two still has RAC feature, with a maximum of two single-socket servers.

– Customers with SE on 4 socket nodes (or clusters) will need to migrate to 2 socket nodes (or clusters)

– Customers with SE One should definitely be prepared to spend some money to upgrade to SE Two, which comes at the same price of the old Standard Edition. ($17,500 per socket).

– the smallest amount of NUP licenses when licensing per named users has been increased to 10 (it was 5 with SE and SE One).

– Each SE2 Database can run max 16 user threads (in RAC, max 8 per instance). This is limited by the database Resource Manager. It does not prevent customers from using all the cores, in case they want to deploy many databases per server.


So, finally, less scalability for the same pricetag.

Other bloggers have already written about the behaviour of SE2. The best blog post is IMO from Franck Pachot. http://blog.dbi-services.com/oracle-standard-edition-two/

Cheers

Ludo

Block Change Tracking and Duplicate: avoid ORA-19755

If you use Block Change Tracking on your production database and try to duplicate it, you there are good possibilities that you will encounter this error:

The problem is caused by the block change tracking file entry that exists in the target controlfile, but Oracle can’t find the file because the directory structure on the auxiliary server changes.

After the restore and recovery of the auxiliary database, the duplicate process tries to open the DB but the bct file doesn’t exist and the error is thrown.

If you do a quick google search you will find several workarounds:

  • disable the block change tracking after you get the error and manually open the auxiliary instance (this prevent the possibility to get the duplicate outcome from the rman return code)
  • disable the BCT on the target before running the duplicate (this forces your incremental backups to read all your target database!)
  • Richard Harrison proposed another workaround, you can read more about it here.

There is another workaround that I like more (and that you can also find as comment in Richard’s post):

  • Disable the Block Change Tracking on the auxiliary while it’s doing the restore/recovery (in mounted status)

(This solutions isn’t coming from me, but as far as I know, the father of this solution is a colleague working at Trivadis.)

You can easily fork a process before running the duplicate command that:

  • loops and checks the auxiliary instance status
  • run the disable as soon as the auxiliary is mounted

I’ve worked out this script that does the job:

Run it  just before the duplicate! e.g.

HTH

Ludovico

Check the actual ulimits for all the running Oracle instances

I’ve read the recent good post from my friend Rene on Pythian’s Blog about how to troubleshoot when user ulimits are different from what specified in limits.conf:

Quick Tip : Oracle User Ulimit Doesn’t Reflect Value on /etc/security/limits.conf

I would like to add my 2 cents:

Once you fix the problem, you may want to check (any maybe monitor) when an instance is running with a wrong value (and maybe encounter the famous Error message: Linux-x86_64 Error: 23: Too many open files in system).

This single line gives you an overview of all your instances at once:

If you find any wrong values, plan a restart before you encounter any error during peak hours!

Ludo


Smart Bash Prompt for Oracle

If you are an Oracle customer who has several database versions running, you have to deal with scripts that become more and more complex to maintain. Depending on the version or the edition of your database, you may want to run different pieces of code. This forces you to get programmatically more information about your database version and edition (e.g., in order to run a statspack or AWR report if your software is either Enterprise or Standard).
The most common way to get information about the software is connecting to the database and getting it through a couple of selects. But what if you don’t have any running databases?
The ORACLE_HOME inventory has such information, and you can get it with a short shell function:

The snippet searches for a patchset entry in comps.xml to get the patch version rather than the base version (for releases prior to 11gR2 where out-of-place patching occurs). If a patchset cannot be found, it looks for the base version. Depending on the major release, the information about the edition is either in globalvariables.xml (11g, 12c) or in context.xml (10g).
When you call this “ohversion” function, you get both the Oracle version and the edition of your current ORACLE_HOME.
If you’re using the bash as user shell, you may want to take one step forward and  include this information in a much fancier bash prompt than the prompt by default:

2015_06_05_16_22_56_sso0419iAlthough this prompt may seem long, it has several advantages that save you a lot of typing:
• The newline character inside the prompt let’s you start typing commands on an almost empty line so you don’t have to worry about how long your command is.
• The full username@host:path can be copied and pasted quickly for scp commands.
• The time inside the square brackets is helpful to track timings.
• The indication of the current environment (version, edition, SID) lets you know which environment you’re working on.
• The leading number is the exit code of the last command ($?). It’s green when the exit code is zero and red for all other exit codes.
• Hash characters before and after the prompt mitigate the risk of copying and pasting the wrong line by mistake inside your session.

Note: this post originally appeared on IOUG Tips & Best Practices Booklet 9th edition.

Moving Clusterware Interconnect from single NIC/Bond to HAIP

Very recently I had to configure a customer’s RAC private interconnect from bonding to HAIP to get benefit of both NICs.

So I would like to recap here what the hypothetic steps would be if you need to do the same.

In this example I’ll switch from a single-NIC interconnect (eth1) rather than from a bond configuration, so if you are familiar with the RAC Attack! environment you can try to put everything in place on your own.

First, you need to plan the new network configuration in advance, keeping in mind that there are a couple of important restrictions:

  1. Your interconnect interface naming must be uniform on all nodes in the cluster. The interconnect uses the interface name in its configuration and it doesn’t support different names on different hosts
  2. You must bind the different private interconnect interfaces in different subnets (see Note: 1481481.1 – 11gR2 CSS Terminates/Node Eviction After Unplugging one Network Cable in Redundant Interconnect Environment if you need an explanation)


Implementation 

The RAC Attack book uses one interface per node for the interconnect (eth1, using network 172.16.100.0)

To make things a little more complex, we’ll not use the eth1 in the new HAIP configuration, so we’ll test also the deletion of the old interface.

What you need to do is add two new interfaces (host only in your virtualbox) and configure them as eth2 and eth3, e.g. in networks 172.16.101.0 and 172.16.102.0)


modify /var/named/racattack in order to use the new addresses (RAC doesn’t care about logical names, it’s just for our convenience):

add also the reverse lookup in  in-addr.arpa:


restart  named on the first node and check that both nodes can ping all the names correctly:

check the nodes that compose the cluster:

on all nodes, make a copy of the gpnp profile.xml (just in case, the oifcfg tool does the copy automatically)

List the available networks:

Get the current ip configuration for the interconnect:

one one node only, set the new interconnect interfaces:

check that the other nodes has received the new configuration:

Before deleting the old interface, it would be sensible to stop your cluster resources (in some cases, one of the nodes may be evicted), in any case the cluster must be restarted completely in order to get the new interfaces working.

Note: having three interfaces in a HAIP interconnect is perfectly working, HAIP works from 2 to 4 interfaces. I’m showing how to delete eth1 just for information!! 🙂

on all nodes, shutdown the CRS:

Now you can disable the old interface:

and modify the parameter ONBOOT=no inside the configuration script of eth1 interface.

Start the cluster again:

And check that the resources are up & running:


 Testing the high availability

Disconnect cable from one of the two interfaces (virtually if you’re in virtualbox 🙂 )

Pay attention at the NO-CARRIER status (in eth2 in this example):

check that the CRS is still up & running:


The virtual interface eth2:1 as failed over on the second interface as eth3:2


After the cable is reconnected, the virtual interface is back on eth2:


Further information

For this post I’ve used a RAC version 11.2, but RAC 12c use the very same procedure.

You can discover more here about HAIP:

http://docs.oracle.com/cd/E11882_01/server.112/e10803/config_cw.htm#HABPT5279 

And here about how to set it (beside this post!):

https://docs.oracle.com/cd/E11882_01/rac.112/e41959/admin.htm#CWADD90980

https://docs.oracle.com/cd/E11882_01/rac.112/e41959/oifcfg.htm#BCGGEFEI


Cheers

Ludo

Oracle Multitenant and custom DBCA templates

Today I’ve encountered an annoying issue while adapting a few scripts for automatic database creation. I track it here so hopefully it may save a few hours of troubleshooting to someone…

I’ve used the DBCA to prepare a new template:


Then continued by customizing other options, including init parameters and datafile/logfile paths. Finally, I’ve saved it as a new template instead of creating the database.

I’ve checked the resulting .dbc and seen that there was, as expected, the parameter “enable_pluggable_database”=”true”.

Then I’ve moved the template file to my $HOME directory and tested the silent database creation with the option “-createAsContainerDatabase true”:

The database configuration has completed successfully, without errors. I’ve accessed my new container, and I’ve been surprised by seing:

In fact, there were no pdb$seed datafiles:

After little investigation, I’ve found these lines in the dbca trace.log:


Then I’ve struggled with dbca and templates a few times before finding that, actually, the magic “enable pluggable database” is done by dbca only if the template file name is not customized.

Running the same exact command with the very same template file but renamed to $ORACLE_HOME/assistants/dbca/templates/General_Purpose.dbc actually works (notice the diff at the first line):


I’ve also tried to cheat and use a symlink to my previous custom template, and surprisingly, it still works:

In the dbca trace log the message saying that the DB will be NON-CDB disappears:

So the problem is really caused by the different filename/location of the template.

IMHO it’s a kind of bug, the decision between a CDB and NON-CDB should not be taken by DBCA.  Moreover, it’s not based on the content of the template, which would be logic. But today I’m late and lazy, I will not open a SR for this.

:-/

Multinode RAC 12c cluster on VirtualBox using linked clones

Recently I’ve had to install a four-node RAC cluster on my laptop in order to do some tests. I have found an “easy” (well, easy, it depends), fast and space-efficient way to do it so I would like to track it down.

The quick step list

  • Install the OS on the first node
  • Add the shared disks
  • Install the clusterware in RAC mode on on the first node only
  • Remove temporarily the shared disks
  • Clone the server as linked clone as many times as you want
  • Reconfigure the new nodes with the new ip and naming
  • Add back the shared disks on the first node and on all other nodes
  • Clone the GI + database homes in order to add them to the cluster

Using this method the Oracle binaries (the most space consuming portion of the RAC installation) are installed and allocated on the first node only.

The long step list

Actually you can follow many instruction steps from the RAC Attack 12c book.

  • Review the HW requirements  but let at least 3Gb RAM for each guest + 2Gb more for your host (you may try with less RAM but everything will slow down).
  • Download all the SW components , additionally you may download the latest PSU (12.1.0.1.2) from MOS.
  • Prepare the host and install linux on the first node. When configuring the OS, make sure you enter all the required IP addresses for the additional nodes. RAC Attack has two nodes collabn1, collabn2. Add as many nodes as you want to configure. As example, the DNS config may have four nodes

At this point, the procedure starts differing from the RAC Attack book.

  •  Go to the VirtualBox VM settings and delete all the shared disks2014_03_16_22_05_26_Oracle_VM_VirtualBox_Manager
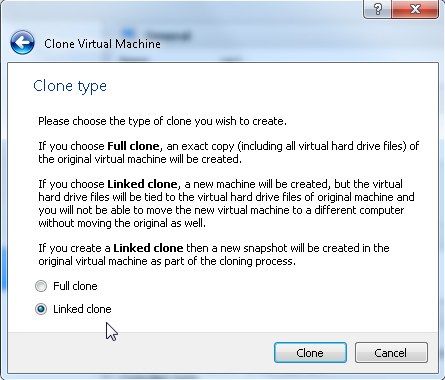
  •  Clone the first server as linked clone (right-click, clone, choose the name, flag “Linked Clone” as many times as the number of additional servers you want.

2014-03-16 22_09_42-Clone Virtual Machine


  • By using this method  the new servers will use the same virtual disk file of the first server and a second file will be used to track the differences. This will save a lot of space on the disk.
  • Add back the shared disks to all the servers.
  • Start the other nodes and configure them following the RAC Attack instructions again.
  • Once all the nodes are configured, the GI installation has to be cleaned out on all the cloned servers using these guidelines:

  • Then, on each cloned server, run the perl clone.pl as follows to clone the GI home, but change the LOCAL_NODE accordingly (note: the GI Home name must be identical to the one specified in the original installation!):

  •  Then, on the first node (that you have started and you have reactivated the clusterware stack on it with crsctl enable crs / crsctl start crs ;-)), run this command to add the new nodes in the definition of the cluster:


  • from the first server copy these files on all the other nodes:

  •  Then clone also the DB Home (again, run it on each new server and specify the same DB home name that you have used in the original installation):

  •  On each new node run also the updatenodelist and the DB root.sh command to update the node list for the DB home:

  •  and finally, run the GI root.sh on each new node to finalize their inclusion in the cluster!! 🙂


  • As result, you should be able to seen all the cluster resources started correctly on all the nodes.


I know it seems a little complex, but if you have several nodes this is dramatically faster than the standard installation and also the space used is reduced. This is good if you have invested in a high-performance but low-capacity SSD disk like I did :-(.

Hope it helps, I paste here the official documentation links that I’ve used to clone the installations. The other steps are my own work.

References