I love seeing people suggesting Oracle Data Guard Fast-Start Failover for high availability. Nevertheless, there are a few problems with the architecture and steps proposed in the article.
I sent my comments via Disqus on the AWS blogging platform, but after a month, my comment was rejected, and the blog content hasn’t changed.
For this reason, I don’t have other places to post my comment but here…
The steps used to create the database service do not include any HA property, which will make most efforts useless. (see Table 153-6 in the link above).
But, most important, TAF (or Oracle connectivity in general) does NOT require a host IP change! There is no need to change the DNS when using the recommended connection string with multiple address_lists.
If you need to implement a complex architecture using a software solution, pay attention that the practices suggested by the partner/integrator/3rd party match the ones from the software vendor. In the case of Oracle Data Guard, Oracle knows better 😉
One of the challenges of automation in bin Oracle Environments is dealing with tnsnames.ora files.
These files might grow big and are sometimes hard to distribute/maintain properly.
The worst is when manual modifications are needed: manual operations, if not made carefully, can screw up the connection to the databases.
The best solution is always using LDAP naming resolution. I have seen customers using OID, OUD, Active Directory, openldapd, all with a great level of control and automation. However, some customer don’t have/want this possibility and keep relying on TNS naming resolution.
When Data Guard (and eventually RAC) are in place, the tnsnames.ora gets filled by entries for the DGConnectIdentifiers and StaticConnectIdentifier. If I add the observer, an additional entry is required to access the dbname_CFG service created by the Fast Start Failover.
Actually, all these entries are not required if I use Easy Connect.
The basic configuration with Data Guard is quite simple to achieve with Easy Connect. In this examples I have:
– The primary database TOOLCDB1_SITE1
– The duplicated database for standby TOOLCDB1_SITE2
After setting up the static registration (no Grid Infrastructure in my lab):
Lisp
1
2
3
4
5
6
7
8
SID_LIST_LISTENER=
(SID_LIST=
(SID_DESC=
(GLOBAL_DBNAME=TOOLCDB1_SITE1_DGMGRL)
(SID_NAME=TOOLCDB1)
(ORACLE_HOME=/u01/app/oracle/product/db_19_8_0)
)
)
and copying the passwordfile, the configuration can be created with:
Oracle PL/SQL
1
2
3
4
5
6
7
8
9
10
11
12
13
14
DGMGRL> create configuration TOOLCDB1 as primary database is TOOLCDB1_SITE1 connect identifier is 'newbox01:1521/TOOLCDB1_SITE1';
Configuration "toolcdb1" created with primary database "toolcdb1_site1"
DGMGRL> edit database TOOLCDB1_SITE1 set property 'StaticConnectIdentifier'='newbox01:1521/TOOLCDB1_SITE1_DGMGRL';
Property "StaticConnectIdentifier" updated
DGMGRL> add database TOOLCDB1_SITE2 as connect identifier is 'newbox02:1521/TOOLCDB1_SITE2';
Database "toolcdb1_site2" added
DGMGRL> edit database TOOLCDB1_SITE2 set property 'StaticConnectIdentifier'='newbox02:1521/TOOLCDB1_SITE2_DGMGRL';
Property "StaticConnectIdentifier" updated
DGMGRL> enable configuration;
Enabled.
That’s it.
Now, if I want to have the configuration observed, I need to activate the Fast Start Failover:
Oracle PL/SQL
1
2
3
4
5
6
7
8
9
10
11
12
13
14
15
16
17
DGMGRL> edit database toolcdb1_site1 set property LogXptMode='SYNC';
Property "logxptmode" updated
DGMGRL> edit database toolcdb1_site2 set property LogXptMode='SYNC';
Property "logxptmode" updated
DGMGRL> edit database toolcdb1_site1 set property FastStartFailoverTarget='toolcdb1_site2';
Property "faststartfailovertarget" updated
DGMGRL> edit database toolcdb1_site2 set property FastStartFailoverTarget='toolcdb1_site1';
Property "faststartfailovertarget" updated
DGMGRL> edit configuration set protection mode as maxavailability;
Succeeded.
DGMGRL> enable fast_start failover;
Enabled in Zero Data Loss Mode.
With just two databases, FastStartFailoverTarget is not explicitly needed, but I usually do it as other databases might be added to the configuration in the future.
After that, the broker complains that FSFO is enabled but there is no observer yet:
Oracle PL/SQL
1
2
3
4
5
6
7
8
9
10
11
12
13
14
15
16
17
18
19
20
21
22
23
24
25
26
27
28
29
30
31
32
33
34
35
36
37
38
39
40
41
42
43
44
DGMGRL> show fast_start failover;
Fast-Start Failover: Enabled in Zero Data Loss Mode
Protection Mode: MaxAvailability
Lag Limit: 0 seconds
Threshold: 180 seconds
Active Target: toolcdb1_site2
Potential Targets: "toolcdb1_site2"
toolcdb1_site2 valid
Observer: (none)
Shutdown Primary: TRUE
Auto-reinstate: TRUE
Observer Reconnect: 180 seconds
Observer Override: FALSE
Configurable Failover Conditions
Health Conditions:
Corrupted Controlfile YES
Corrupted Dictionary YES
Inaccessible Logfile NO
Stuck Archiver NO
Datafile Write Errors YES
Oracle Error Conditions:
(none)
DGMGRL> show configuration;
Configuration - toolcdb1
Protection Mode: MaxAvailability
Members:
toolcdb1_site1 - Primary database
Warning: ORA-16819: fast-start failover observer not started
toolcdb1_site2 - (*) Physical standby database
Fast-Start Failover: Enabled in Zero Data Loss Mode
Configuration Status:
WARNING (status updated 39 seconds ago)
Observer for multiple configurations
This feature has been introduced in 12.2 but it is still not widely used.
Before 12.2, the Observer was a foreground process: the DBAs had to start it in a wrapper script executed with nohup in order to keep it live.
Since 12.2, the observer can run as a background process as far as there is a valid wallet for the connection to the databases.
Also, 12.2 introduced the capability of starting multiple configurations with a single dgmgrl command: “START OBSERVING”.
First, I need a wallet. And here comes the first compromise:
Having a single dgmgrl session to start all my configurations means that I have a single wallet for all the databases that I want to observe.
Fair enough, all the DBs (CDBs?) are managed by the same team in this case.
If I have only observers on my host I can easily point to the wallet from my central sqlnet.ora:
Which connection descriptors do I need?
The Observer uses the DGConnectIdentifier to keep observing the databases, but needs a connection to both of them using the TOOLCDB1_CFG service (unless I specify something different with the broker configuration property ConfigurationWideServiceName) to connect to the configuration and get the DGConnectIdentifier information. Again, you can check it in the doc. or the note Oracle 12.2 – Simplified OBSERVER Management for Multiple Fast-Start Failover Configurations (Doc ID 2285891.1)
So I need to specify three secrets for three connection descriptors:
Oracle Secret Store Tool Release 21.0.0.0.0 - Production
Version 21.0.0.0.0
Copyright (c) 2004, 2020, Oracle and/or its affiliates. All rights reserved.
Your secret/Password is missing in the command line
Enter your secret/Password:
Re-enter your secret/Password:
Enter wallet password:
The first one will be used for the initial connection. The other two to observe the Primary and Standby.
I need to be careful that the first EZConnect descriptor matches EXACTLY what I put in observer.ora (see next step) and the last two match my DGConnectIdentifier (unless I specify something different with ObserverConnectIdentifier), otherwise I will get some errors and the observer will not observe correctly (or will not start at all).
The dgmgrl needs then a file named observer.ora.
$ORACLE_BASE/admin/observers or the central TNS_ADMIN would be good locations, but what if I have observers that must be started from multiple Oracle Homes?
In that case, having a observer.ora in $ORACLE_HOME/network/admin (or $ORACLE_BASE/homes/{OHNAME}/network/admin/ if Read-Only Oracle Home is enabled) would be a better solution: in this case I would need to start one session per Oracle Home
The content of my observer.ora must be something like:
This is the example for my configuration, but I can put as many (CONFIG=…) as I want in order to observe multiple configurations.
Then, if everything is configured properly, I can start all the observers with a single command:
Oracle PL/SQL
1
2
3
4
5
6
7
8
9
10
11
12
13
14
15
16
17
18
19
20
21
22
23
24
DGMGRL> SET OBSERVERCONFIGFILE=/u01/app/oracle/admin/observers/observer.ora
DGMGRL> START OBSERVING
ObserverConfigFile=observer.ora
observer configuration file parsing succeeded
Submitted command "START OBSERVER" using connect identifier "newbox01,newbox02:1521/TOOLCDB1_CFG"
Check superobserver.log, individual observer logs and Data Guard Broker logs for execution details.
In my config, the Oracle Database version is 19.7 and the databases are actually CDBs. No Grid Infrastructure, non-OMF datafiles.
It is important to highlight that a lot of things have changed since 12.1. And because 19c is the LTS version now, it does not make sense to try anything older.
First, I just want to make sure that my standbys are aligned.
PR00 (PID:6718): Media Recovery Waiting for T-1.S-41
So, yeah, not having OMF might get you some warnings like: WARNING: File being created with same name as in Primary
But it is good to know that the cascade standby deals well with new PDBs.
Of course, this is not of big interest as I know that the problem with Multitenant comes from CLONING PDBs from either local or remote PDBs in read-write mode.
So absolutely the same behavior between the two levels of standby.
According to the documentation: https://docs.oracle.com/en/database/oracle/oracle-database/19/sqlrf/CREATE-PLUGGABLE-DATABASE.html#GUID-F2DBA8DD-EEA8-4BB7-A07F-78DC04DB1FFC
I quote what is specified for the parameter STANDBYS={ALL|NONE|…}: “If you include a PDB in a standby CDB, then during standby recovery the standby CDB will search for the data files for the PDB. If the data files are not found, then standby recovery will stop and you must copy the data files to the correct location before you can restart recovery.”
“Specify ALL to include the new PDB in all standby CDBs. This is the default.”
“Specify NONE to exclude the new PDB from all standby CDBs. When a PDB is excluded from all standby CDBs, the PDB’s data files are unnamed and marked offline on all of the standby CDBs. Standby recovery will not stop if the data files for the PDB are not found on the standby. […]”
So, in order to avoid the MRP to crash, I should have included STANDBYS=NONE
But the documentation is not up to date, because in my case the PDB is skipped automatically and the recovery process DOES NOT STOP:
However, the recovery is marked ENABLED for the PDB on the standby, while usind STANDBYS=NONE it would have been DISABLED.
Oracle PL/SQL
1
2
3
4
5
6
7
1*selectname,recovery_statusfromv$pdbs
NAMERECOVERY
------------------------------ --------
PDB$SEEDENABLED
LATERALUSENABLED
PNEUMAENABLED
So, another difference with the doc who states: “You can enable a PDB on a standby CDB after it was excluded on that standby CDB by copying the data files to the correct location, bringing the PDB online, and marking it as enabled for recovery.”
This reflects the findings of Philippe Fierens in his blog (http://pfierens.blogspot.com/2020/04/19c-data-guard-series-part-iii-adding.html).
This behavior has been introduced probably between 12.2 and 19c, but I could not manage to find exactly when, as it is not explicitly stated in the documentation.
However, I remember well that in 12.1.0.2, the MRP process was crashing.
In my configuration, not on purpose, but interesting for this article, the first standby has the very same directory structure, while the cascaded standby has not.
In any case, there is a potentially big problem for all the customers implementing Multitenant on Data Guard:
With the old behaviour (MRP crashing), it was easy to spot when a PDB was cloned online into a primary database, because a simple dgmgrl “show configuration” whould have displayed a warning because of the increasing lag (following the MRP crash).
With the current behavior, the MRP keeps recovering and the “show configuration” displays “SUCCESS” despite there is a PDB not copied on the standby (thus not protected).
The missing PDB is easy to spot once I know that I have to do it. However, for each PDB to recover (I might have many!), I have to prepare the rename of datafiles and creation of directory (do not forget I am using non-OMF here).
Now, the datafile names on the standby got changed to …/UNNAMEDnnnnn.
So I have to get the original ones from the primary database and do the same replace that db_file_name_convert would do:
Oracle PL/SQL
1
2
3
4
settrimon
colrename_filefora300
setlines400
select'set newname for datafile '||file#||' to '''||replace(name,'/TOOLCDB1/','/TOOLCDX1/')||''';'asrename_filefromv$datafilewherecon_id=6;
and put this in a rman script (this will be for the second standby, the first has the same name so same PATH):
Then, I need to stop the recovery, start it and stopping again, put the datafiles online and finally restart the recover.
These are the same steps used my Philippe in his blog post, just adapted to my taste 🙂
Now, I do not have anymore any datafiles offline on the standby:
Oracle PL/SQL
1
2
3
SQL>select'ERROR: CON_ID '||con_id||' has '||count(*)||' datafiles offline!'fromv$recover_filewhereonline_status='OFFLINE'groupbycon_id;
norowsselected
I will not publish the steps for the second standby, they are exactly the same (same output as well).
At the end, for me it is important to highlight that monitoring the OFFLINE datafiles on the standby becomes a crucial point to guarantee the health of Data Guard in Multitenant. Relying on the Broker status or “PDB recovery disabled” is not enough.
On the bright side, it is nice to see that Cascade Standby configurations do not introduce any variation, so cascaded standbys can be threated the same as “direct” standby databases.
When consolidating to multitenant, there are several consolidation patterns.
Big, complex databases usually have special requirements for which it might be a good choice to go to single-tenant (a single PDB in one CDB)
Small, relatively easy databases are the best candidate for consolidation to multitenant
Schema consolidated databases require special attention, but in general there are several advantages to convert individual schemas (or group of schemas) to individual PDBs
For the latter, there are some techniques to convert a schema in a PDB.
export/import (obviously), with eventually Golden Gate to do it online
Transportable tablespaces (if the schemas follow strict 1-to-1 tablespace separation
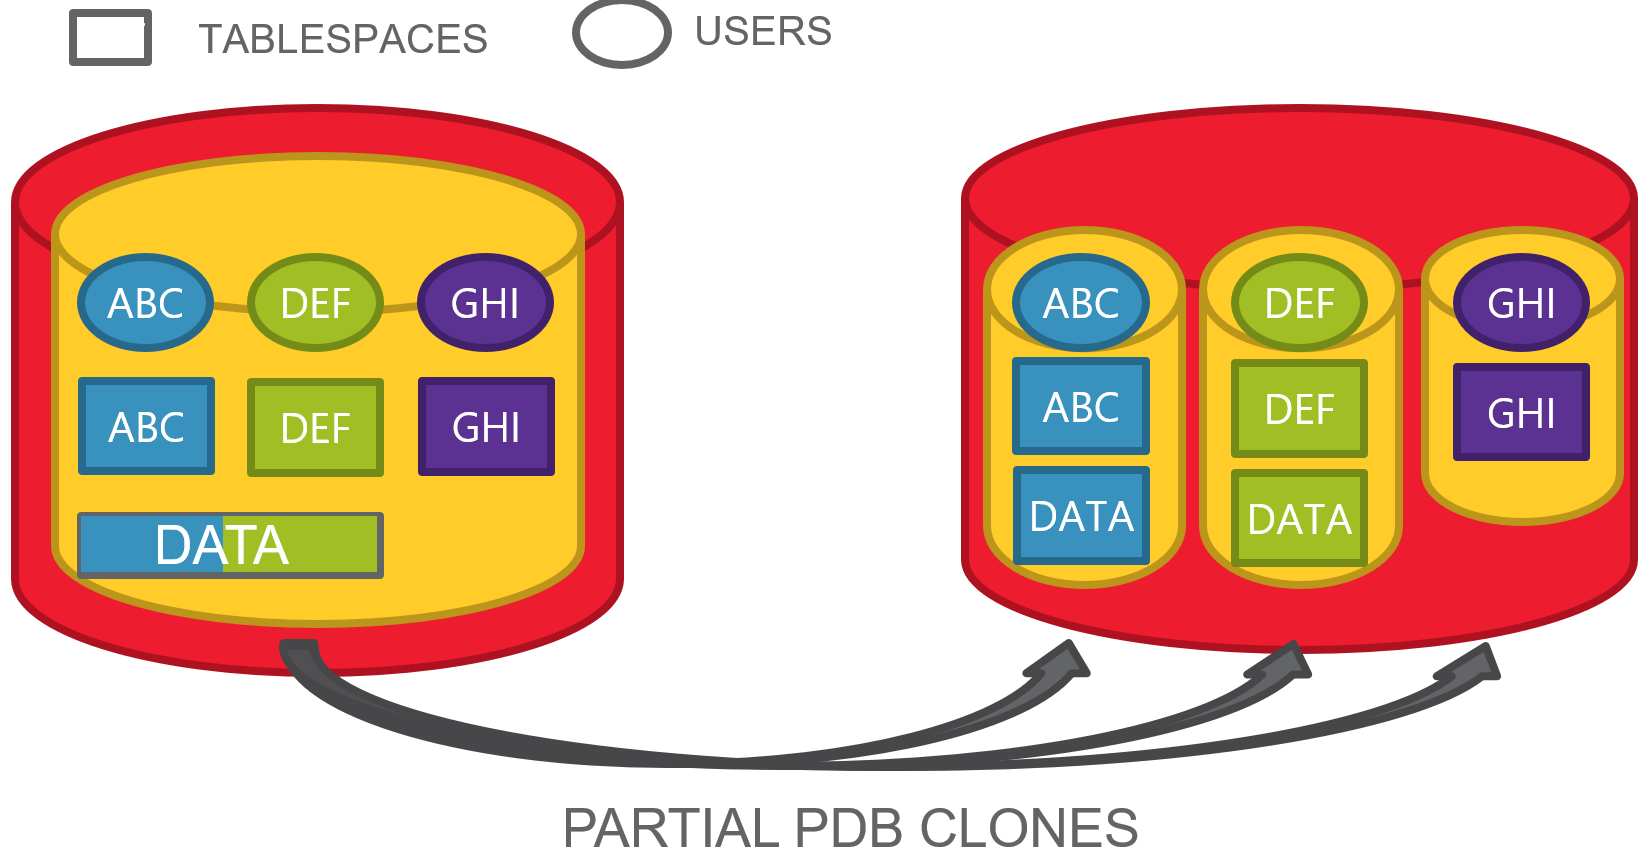
partial PDB cloning
We will focus on the last one for this blog post.
Situation
Here we have a PDB with some schemas, each of them has a dedicated tablespace, but accidentally, two of them have also some objects on a common tablespace.
This happens frequently when all the users have quota on the default database tablespace and they do not have necessarily a personal default tablespace.
This is the typical situation where transportable tablespaces become hard to achieve without some upfront segment movement, as tablespaces are not self-contained.
Thankfully, Oracle Multitenant allows us to clone a PDB from a remote one and specify only a subset of tablespaces.
Not at all! The tables are still there and reference to tablespaces that do not exist anymore. Possible?
Actually, the tablespaces definition are still there if we look at v$tablespace:
Oracle PL/SQL
1
2
3
4
5
6
7
8
9
10
11
12
13
14
SQL>selectnamefromv$tablespace;
NAME
------------------------------
SYSTEM
SYSAUX
UNDOTBS1
TEMP
DATA
ABC
DEF
GHI
8rowsselected.
If we give a look at the DBA_TABLESPACES view definition, there are a few interesting filters:
Oracle PL/SQL
1
2
3
4
5
6
7
createorreplaceviewDBA_TABLESPACES
...
wherets.online$!=3
andbitand(flags,2048)!=2048
andbitand(ts.flags,16777216)!=16777216
...
/
What is their meaning?
Oracle PL/SQL
1
2
3
4
5
6
online$/* status (see KTT.H): */
/* 1 = ONLINE, 2 = OFFLINE, 3 = INVALID */
flags/* various flags: see ktt3.h */
/* 0x800 = this actually describes a group */-- 2048
/* 0x1000000 = bad transport of ts in pdb */-- 16777216
So the first WHERE clause skips all the INVALID TABLESPACES (when you drop a tablespace it is still stored in ts$ with this state), the second skips the definition of TEMPORARY TABLESPACE GROUPS, the third one is actually our candidate.
Indeed, this is what we get from ts$ for these tablespaces:
But the user GHI, who has no objects anymore, is still there.
Oracle PL/SQL
1
2
3
4
5
6
7
8
SQL>selectusernamefromdba_users
2whereusernamein('ABC','DEF','GHI');
USERNAME
-------------------------
GHI
DEF
ABC
So we need to drop it explicitly.
Oracle PL/SQL
1
2
3
4
5
SQL>dropuserghicascade;
Userdropped.
SQL>
Automate the cleanup
This is an example PL/SQL that is aimed to automate the cleanup.
Actually:
Users that had segments in one of the excluded tablespaces but do not have any segments left are just LOCKED (for security reasons, you can guess why).
Tablespaces that meet the “excluded PDB” criteria, are just dropped
Oracle PL/SQL
1
2
3
4
5
6
7
8
9
10
11
12
13
14
15
16
17
18
19
20
21
22
23
24
25
26
27
28
29
30
31
32
33
34
35
36
37
38
39
40
41
42
43
44
45
46
47
48
49
50
51
52
53
54
55
setserveroutputon
DECLARE
-- get the users that had tables in the non-cloned TBSP that do not have any other segments...
dbms_output.put_line('Cannot drop default tablespace '||r_tbsps.name||'. Please change the default tablespace and drop it afterwards.');
END;
ENDLOOP;
END;
/
This is the output for the clone procedure we have just seen:
Oracle PL/SQL
1
2
3
4
5
6
7
8
9
SQL>@cleanup_partial_pdb.sql
ALTERUSERGHIACCOUNTLOCK
UserGHIlocked.
DROPTABLESPACEDEFINCLUDINGCONTENTSANDDATAFILES
TablespaceDEFdropped.
DROPTABLESPACEGHIINCLUDINGCONTENTSANDDATAFILES
TablespaceGHIdropped.
PL/SQLproceduresuccessfullycompleted.
The PL/SQL block can be quite slow depending on the segments and tablespaces, so it might be a good idea to have a custom script instead of this automated one.
What about user DEF?
The automated procedure has not locked the account DEF. Why?
Actually, the user DEF still has some segments in the DATA tablespace. Hence, the procedure cannot be sure what was the original intention: copy the user ABC ? The clone procedure allows only to specify the tablespaces, so this is the only possible result.
The Oracle Multitenant architecture introduces some nice opportunities, including local and remote cloning (see this example on ORACLE_BASE blog).
However, the only available cloning procedure use the PULL method to get the data from the remote source PDB.
This can be a limitation, especially in environments where the cloning environment does not have direct access to the production, or where the clones must be done in the Cloud with no direct access to the production VLAN on-premises.
So, one common approach is to clone/detach locally, put the PDB files in the Object Store and then attach them in the cloud.
Another approach is to use SSH tunnels. If you follow my blog you can see it is something that I use every now and then to do stuff from on-premises to the cloud.
How to set it up?
Actually, it is super-easy: just prepare a script in the cloud that will do the create pluggable database, then trigger it from on-premises.
connect toC##ONPREM identified by manager using '$ALIAS';
create pluggable database$2from$1@onprem_temp;
drop database linkonprem_temp;
alter pluggable database$2open;
alter pluggable database$2save state;
exit
EOF
It takes as parameters: the name of the source PDB, the name of the target PDB and the SQL*Net descriptor to create the temporary database link from the cloud CDB to the on-premises CDB.
The user C##ONPREM must obviously exist on-premises with the following privileges:
The cloud database should use OMF so you don’t have to take care about file name conversions.
At this point, if you have set up correctly the SSH keys to connect to the cloud server, it is just a matter of running the script remotely using the proper SSH tunnel. Once the remote port binding established, the cloud server can contact the on-premises listener port using localhost:remote_bind:
Of course the timing depends a lot on the size of the database and your connection to the Cloud.
I have tested this procedure with Oracle Database 19.7 on OCI compute instances and on DBaaS VM instance, it works without any additional work. Of course, it does not work for Autonomous Database 🙂
There are cases, however, where you cannot do it. For example, it the existing PDB should have been the clone, or if you are converting a copy of the same database from Non-CDB to PDB using autoupgrade (with autoupgrade you cannot modify the CREATE PLUGGABLE DATABASE statement).
In this case, the solution might be to change the DBID of the existing PDB, via unplug/plug:
With Oracle 19c, Oracle has released a new script, annotated for parallel execution, to create the CATALOG and CATPROC in parallel at instance creation.
I have a customer who is in the process of migrating massively to Multitenant using many CDBs, so I decided to give it a try to check how much time they could save for the CDB creations.
I have run the tests on my laptop, on a VirtualBox VM with 4 vCPUs.
Test 1: catalog.sql + catproc.sql
In this test, I use the classic way (this is also the case when DBCA creates the scripts):
The catalog is created first on CDB$ROOT and PDB$SEED. Then the catproc is created.
Looking at the very first occurrence of BEGIN_RUNNING (start of catalog for CDB$ROOT) and the very last of END_RUNNING in the log (end of catproc in PDB$SEED), I can see that it took ~ 44 minutes to complete:
This creates catalog and catproc first on CDB$ROOT, than creates them on PDB$SEED. So, same steps but in different orders.
By running vmstat in the background, I noticed during the run that most of the time the creation was running serially, and when there was some parallelism, it was short and compensated by a lot of process synchronizations (waits, sleeps) done by the catctl.pl.
At the end, the process took ~ 45 minutes to complete.
and put the audit_trail=DB in the upgrade pfile (was NONE in this specific case).
After that, restarted the DB in upgrade mode using the same pfile.
After that, the view was giving no errors anymore and we resumed the autoupgrade job.
Oracle PL/SQL
1
2
3
SQL>select*fromwmsys.wm$migration_error_view;
norowsselected
This is an old troubleshooting method that I call “Database Administration by guess”: I am not sure about the real cause, but the workaround just worked fine for us.
It would be interesting to know if anyone of you have had the same problem, and what were the auditing parameters in your case…
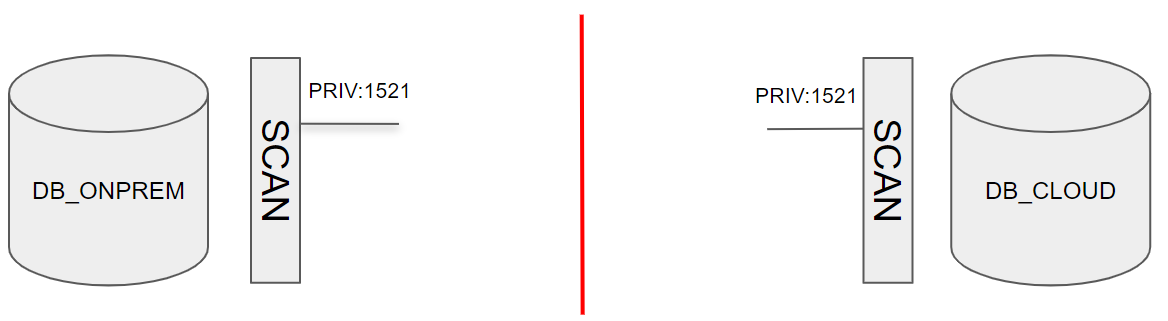
I am fascinated about the new Zero Downtime Migration tool that has been available since November 28th. Whilst I am still in the process of testing it, there is one big requirement that might cause some headache to some customers. It is about network connectivity:
The source database server […] can connect to target database instance over target SCAN through the respecitve scan port and vice versa.
The SCAN of the target should be resolvable from the source database server, and the SCAN of the source should resolve from the target server.
Having connectivity from both sides, you can synchronize between the source database and target database from either side. […]
If you are taking cloud migrations seriously, you should have either a VPN site-to-site to the cloud, or a Fast Connect link. At CERN we are quite lucky to have a high bandwidth Fast Connect to OCI Frankfurt.
This requirement might be missing for many customers, so what is a possible solution to setup connectivity for database duplicates and Data Guard setups?
In the picture above you can see a classic situation, that usually has two problems that must be solved:
the SCAN addresses are private: not accessible from internet
there are multiple SCAN addresses, so tunneling through all of them might be complex
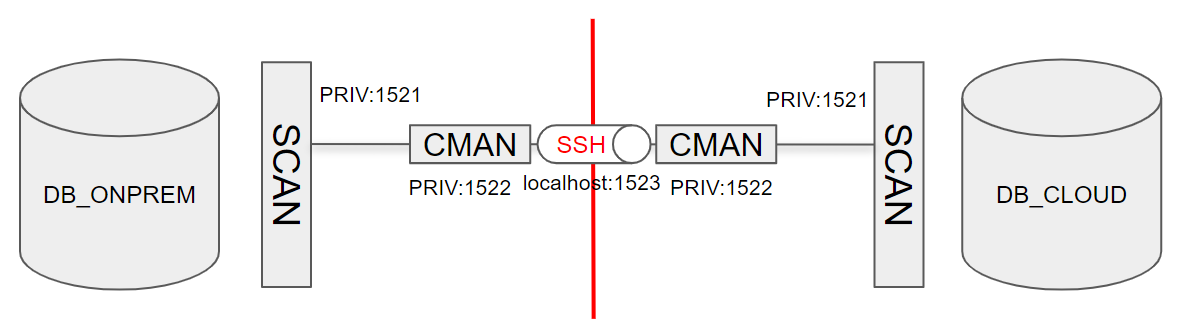
Is it possible to configure CMAN in front of the SCAN listener as a single IP entry and tunnel through SSH to this single IP?
I will show now how to achieve this configuration.
For sake of simplicity, I have put two single instances without SCAN and a CMAN installation on the database servers, but it will work with little modification using SCAN and RAC setups as well. Note that in a Cloud Infrastructure setup, this will require a correct setup of the TDE wallet on both the source and the destination.
Because I put everything on s single host, I have to setup CMAN to listen to another port, but having a separate host for CMAN is a better practice when it has to proxy to SCAN listeners.
Installing and configuring CMAN
The most important part of the whole setup is that the CMAN on the standby site must have a public IP address and open SSH port so that we can tunnel through it.
The on-premises CMAN must have open access to the standby CMAN port 22.
This configuration is not secure at all, you might want to secure it further in order to allow only the services needed for setting up Data Guard.
The registration of database services to CMAN through the the remote_listener parameter is optional, as I will register the entries statically in the listener and use a routed connection through CMAN.
Listener configuration
The listener must have a static entry for the database, so that duplicate and switchover work properly.
In a RAC config, all the local listeners must be configured with the correct SID_NAME running on the host. Make sure to reload the listeners 😉
Creating the SSH tunnels
There must be two tunnels open: one that tunnels from on-premises to the cloud and the other that tunnels from the cloud to on-premises.
However, such tunnels can both be created from the on-premises CMAN host that has access to the cloud CMAN host:
Shell
1
2
3
4
5
# bind local port 1523 to remote port 1522
ssh-NnTf cman-cloud-L1523:cman-cloud:1522
# bind remote port 1523 to local port 1522
ssh-NnTf cman-cloud-R1523:cman-onprem:1522
in my case, the hostnames are:
Shell
1
2
ssh-NnTf ludodb02-L1523:ludodb02:1522
ssh-NnTf ludodb02-R1523:ludodb01:1522
Important: with CMAN on a host other than the DB server, the CMAN sshd must be configured to have GatewayPorts set to yes:
Oracle PL/SQL
1
GatewayPortsyes
After the tunnels are open, any connections to the local CMAN server port 1523 will be forwarded to the remote CMAN port 1522.
Configuring the TNSNAMES to hop through CMAN and SSH tunnel
Both servers must have now one entry for the local database pointing to the actual SCAN (or listener for single instances) and one entry for the remote database pointing to local port 1523 and routing to the remote scan.
After copying the passwordfile and starting nomount the cloud database, it should be possible from both sides to connect as SYSDBA to both DB_CLOUD and DB_ONPREM.
This configuration is ready for both duplicate from active database and for Data Guard.
I still have to figure out if it works with ZDM, but I think it is a big step towards establishing connection between on-premises and the Oracle Cloud when no VPN or Fast Connect are available.
RMAN> duplicate target database for standby from active database ;
Setting up Data Guard
Configure broker config files
Add and clear the standby logs
Start the broker
Create the configuration:
Oracle PL/SQL
1
2
3
4
5
6
create configuration db as primary database is db_onprem connect identifier is 'db_onprem';
add database db_cloud as connect identifier is 'db_cloud';
edit database db_onprem set property StaticConnectIdentifier='db_onprem';
edit database db_cloud set property StaticConnectIdentifier='db_cloud';
enable configuration;
show configuration;
The static connect identifier here is better if it uses the TNSNAMES resolution because each database sees each other differently.
Checking the DG config
A validate first:
Oracle PL/SQL
1
2
3
4
5
6
7
8
9
10
11
12
13
14
15
16
17
18
19
20
21
22
23
24
25
26
27
28
29
30
31
DGMGRL> show configuration;
Configuration - db
Protection Mode: MaxPerformance
Members:
db_onprem - Primary database
db_cloud - Physical standby database
Fast-Start Failover: Disabled
Configuration Status:
SUCCESS (status updated 56 seconds ago)
DGMGRL> validate database db_cloud;
Database Role: Physical standby database
Primary Database: db_onprem
Ready for Switchover: Yes
Ready for Failover: Yes (Primary Running)
Flashback Database Status:
db_onprem: Off
db_cloud : Off
Managed by Clusterware:
db_onprem: NO
db_cloud : NO
Validating static connect identifier for the primary database db_onprem...
The static connect identifier allows for a connection to database "db_onprem".
Than a switchover, back and forth:
Oracle PL/SQL
1
2
3
4
5
6
7
8
9
10
11
12
13
14
15
16
17
18
19
20
21
22
23
24
25
26
27
28
29
30
31
32
33
34
35
36
37
38
39
40
41
42
43
44
DGMGRL> switchover to db_cloud;
Performing switchover NOW, please wait...
Operation requires a connection to database "db_cloud"
Connecting ...
Connected to "db_cloud"
Connected as SYSDBA.
New primary database "db_cloud" is opening...
Operation requires start up of instance "db" on database "db_onprem"
Starting instance "db"...
Connected to an idle instance.
ORACLE instance started.
Connected to "db_onprem"
Database mounted.
Connected to "db_onprem"
Switchover succeeded, new primary is "db_cloud"
DGMGRL> show configuration;
Configuration - db
Protection Mode: MaxPerformance
Members:
db_cloud - Primary database
db_onprem - Physical standby database
Fast-Start Failover: Disabled
Configuration Status:
SUCCESS (status updated 57 seconds ago)
DGMGRL> switchover to db_onprem;
Performing switchover NOW, please wait...
Operation requires a connection to database "db_onprem"
Connecting ...
Connected to "db_onprem"
Connected as SYSDBA.
New primary database "db_onprem" is opening...
Operation requires start up of instance "db" on database "db_cloud"
Starting instance "db"...
Connected to an idle instance.
ORACLE instance started.
Connected to "db_cloud"
Database mounted.
Connected to "db_cloud"
Switchover succeeded, new primary is "db_onprem"
Conclusion
Yes, it is possible to setup a Data Guard between two sites that have no connections except mono-directional SSH. The SSH tunnels allow SQL*Net communication to a remote endpoint. CMAN allows to proxy through a single endpoint to multiple SCAN addresses.
However, do not forget about the ultimate goal that is to migrate your BUSINESS to the cloud, not just the database. Therefore, having a proper communication to the cloud with proper performance, architecture and security is crucial. Depending on your target Cloud database, Zero Downtime Migration or MV2ADBshould be the correct and supported solutions.
Choose this one: LINUX.X64_193000_client.zip (64-bit) (1,134,912,540 bytes) , not the one named “LINUX.X64_193000_client_home.zip” because it is a preinstalled home that does not contain the CMAN tools.
Access the OCI Console and create a new Compute instance. The default configuration is OK, just make sure that it is Oracle Linux 7 🙂
Do not forget to add your SSH Public Key to access the VM via SSH!
Access the VM using
Oracle PL/SQL
1
ssh opc@{public_ip}
Copy the Oracle Client zip in /tmp using your favorite scp program.
Install CMAN
Follow these steps to install CMAN:
Oracle PL/SQL
1
2
3
4
5
6
7
8
9
10
11
12
13
14
15
16
17
18
19
20
21
22
23
24
25
26
27
28
29
30
31
32
33
34
35
36
37
38
39
40
41
42
43
# become root
sudo su - root
# install some prereqs (packages, oracle user, kernel params, etc.):
This will create a CMAN configuration named cman-test. Beware that it is very basic and insecure. Please read the CMAN documentation if you want something more secure or sophisticated.
The advantage of having the TNS_ADMIN outside the Oracle Home is that if you need to patch CMAN, you can do it out-of-place without the need to copy the configuration files somewhere else.
The advantage of using IFILE inside cman.ora, is that you can manage easily different CMAN configurations in the same host without editing directly cman.ora, with the risk of messing it up.
Preparing the start/stop script
Create a file /u01/app/oracle/scripts/cman_service.sh with this content:
This website uses cookies to improve your experience. We'll assume you're ok with this, but you can opt-out if you wish.Accept
Privacy & Cookies Policy
Privacy Overview
This website uses cookies to improve your experience while you navigate through the website. Out of these, the cookies that are categorized as necessary are stored on your browser as they are essential for the working of basic functionalities of the website. We also use third-party cookies that help us analyze and understand how you use this website. These cookies will be stored in your browser only with your consent. You also have the option to opt-out of these cookies. But opting out of some of these cookies may affect your browsing experience.
Necessary cookies are absolutely essential for the website to function properly. This category only includes cookies that ensures basic functionalities and security features of the website. These cookies do not store any personal information.
Any cookies that may not be particularly necessary for the website to function and is used specifically to collect user personal data via analytics, ads, other embedded contents are termed as non-necessary cookies. It is mandatory to procure user consent prior to running these cookies on your website.