
Recently I’ve had to install a four-node RAC cluster on my laptop in order to do some tests. I have found an “easy” (well, easy, it depends), fast and space-efficient way to do it so I would like to track it down.
The quick step list
- Install the OS on the first node
- Add the shared disks
- Install the clusterware in RAC mode on on the first node only
- Remove temporarily the shared disks
- Clone the server as linked clone as many times as you want
- Reconfigure the new nodes with the new ip and naming
- Add back the shared disks on the first node and on all other nodes
- Clone the GI + database homes in order to add them to the cluster
Using this method the Oracle binaries (the most space consuming portion of the RAC installation) are installed and allocated on the first node only.
The long step list
Actually you can follow many instruction steps from the RAC Attack 12c book.
- Review the HW requirements but let at least 3Gb RAM for each guest + 2Gb more for your host (you may try with less RAM but everything will slow down).
- Download all the SW components , additionally you may download the latest PSU (12.1.0.1.2) from MOS.
- Prepare the host and install linux on the first node. When configuring the OS, make sure you enter all the required IP addresses for the additional nodes. RAC Attack has two nodes collabn1, collabn2. Add as many nodes as you want to configure. As example, the DNS config may have four nodes
|
1 2 3 4 5 6 7 8 9 10 11 12 13 14 15 |
collabn1 A 192.168.78.51 collabn2 A 192.168.78.52 collabn3 A 192.168.78.53 collabn4 A 192.168.78.54 collabn1-vip A 192.168.78.61 collabn2-vip A 192.168.78.62 collabn3-vip A 192.168.78.63 collabn4-vip A 192.168.78.64 collabn1-priv A 172.16.100.51 collabn2-priv A 172.16.100.52 collabn3-priv A 172.16.100.53 collabn4-priv A 172.16.100.54 collabn-cluster-scan A 192.168.78.251 collabn-cluster-scan A 192.168.78.252 collabn-cluster-scan A 192.168.78.253 |
- Create the shared disks and configure the persistent storage naming using udev.
At this point, the procedure starts differing from the RAC Attack book.
- Skip the creation of the second host and go directly to the VNC Server setup.
- Install the Grid Infrastructure and the Database software using only the first node.
- You may want to install the latest PSU (12.1.0.1.2), use my previous post as guideline
- Once the GI + DB are installed correctly, stop and disable the crs on the first node:
|
1 2 3 |
# <GIHOME>/bin/crsctl stop crs # <GIHOME>/bin/crsctl disable crs # shutdown -h now |
- Go to the VirtualBox VM settings and delete all the shared disks

- Clone the first server as linked clone (right-click, clone, choose the name, flag “Linked Clone” as many times as the number of additional servers you want.
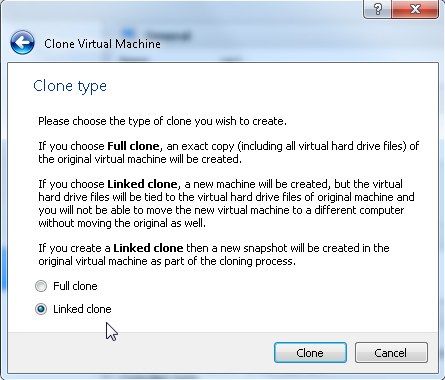
- By using this method the new servers will use the same virtual disk file of the first server and a second file will be used to track the differences. This will save a lot of space on the disk.
- Add back the shared disks to all the servers.
- Start the other nodes and configure them following the RAC Attack instructions again.
- Once all the nodes are configured, the GI installation has to be cleaned out on all the cloned servers using these guidelines:
|
1 2 3 4 5 6 7 8 9 10 11 12 13 14 15 16 17 18 19 20 21 |
cd $GI_HOME rm -rf log/$(hostname) rm -rf gpnp/$(hostname) find gpnp -type f -exec rm -f {} \; rm -rf cfgtoollogs/* rm -rf crs/init/* rm -rf cdata/* rm -rf crf/* rm -rf network/admin/*.ora rm -rf crs/install/crsconfig_params find . -name '*.ouibak' -exec rm {} \; find . -name '*.ouibak.1' -exec rm {} \; rm -rf root.sh* rm -rf rdbms/audit/* rm -rf rdbms/log/* rm -rf inventory/backup/* chown -R oracle:oinstall /u01/app rm -f /etc/init.d/ohasd rm -rf /etc/oracle rm -rf /u01/app/oraInventory/* |
- Then, on each cloned server, run the perl clone.pl as follows to clone the GI home, but change the LOCAL_NODE accordingly (note: the GI Home name must be identical to the one specified in the original installation!):
|
1 2 3 4 5 6 7 8 9 10 11 12 13 14 15 16 17 18 19 20 21 22 23 24 25 26 27 28 29 30 31 32 33 34 35 36 37 38 39 40 41 42 43 44 45 46 47 48 49 50 51 52 53 54 55 56 57 58 59 60 61 62 63 64 |
[oracle@collabn2 bin]$ perl clone.pl -silent ORACLE_BASE=/u01/app/oracle ORACLE_HOME=/u01/app/12.1.0/grid \ ORACLE_HOME_NAME=OraGI12Home1 INVENTORY_LOCATION=/u01/app/oraInventory \ LOCAL_NODE=collabn2 "CLUSTER_NODES={collabn1,collabn2,collabn3,collabn4}" CRS=TRUE ./runInstaller -clone -waitForCompletion "ORACLE_BASE=/u01/app/oracle" "ORACLE_HOME=/u01/app/12.1.0/grid" "ORACLE_HOME_NAME=OraGI12Home1" "INVENTORY_LOCATION=/u01/app/oraInventory" "LOCAL_NODE=collabn2" "CLUSTER_NODES={collabn1,collabn2}" "CRS=TRUE" -silent -paramFile /u01/app/12.1.0/grid/clone/clone_oraparam.ini Starting Oracle Universal Installer... Checking Temp space: must be greater than 500 MB. Actual 5537 MB Passed Checking swap space: must be greater than 500 MB. Actual 3012 MB Passed Preparing to launch Oracle Universal Installer from /tmp/OraInstall2014-02-18_03-40-00PM. Please wait ... You can find the log of this install session at: /u01/app/oraInventory/logs/cloneActions2014-02-18_03-40-00PM.log .................................................. 5% Done. .................................................. 10% Done. .................................................. 15% Done. .................................................. 20% Done. .................................................. 25% Done. .................................................. 30% Done. .................................................. 35% Done. .................................................. 40% Done. .................................................. 45% Done. .................................................. 50% Done. .................................................. 55% Done. .................................................. 60% Done. .................................................. 65% Done. .................................................. 70% Done. .................................................. 75% Done. .................................................. 80% Done. .................................................. 85% Done. .................................................. 90% Done. .................................................. 95% Done. Copy files in progress. Copy files successful. Link binaries in progress. Link binaries successful. Setup files in progress. Setup files successful. Setup Inventory in progress. Setup Inventory successful. Finish Setup successful. The cloning of OraGI12Home1 was successful. Please check '/u01/app/oraInventory/logs/cloneActions2014-02-18_03-40-00PM.log' for more details. As a root user, execute the following script(s): 1. /u01/app/12.1.0/grid/root.sh Execute /u01/app/12.1.0/grid/root.sh on the following nodes: [collabn2,collabn2,collabn3,collabn4] .................................................. 100% Done. [oracle@collabn2 bin]$ su - Password: [root@collabn2 ~]# /u01/app/oraInventory/orainstRoot.sh Changing permissions of /u01/app/oraInventory. Adding read,write permissions for group. Removing read,write,execute permissions for world. Changing groupname of /u01/app/oraInventory to oinstall. The execution of the script is complete. [root@collabn2 ~]# |
- Then, on the first node (that you have started and you have reactivated the clusterware stack on it with crsctl enable crs / crsctl start crs ;-)), run this command to add the new nodes in the definition of the cluster:
|
1 2 3 4 5 6 7 8 9 10 11 12 13 14 15 16 17 18 19 20 21 22 23 24 25 26 27 28 |
[oracle@collabn1 addnode]$ ./addnode.sh -silent -noCopy ORACLE_HOME=/u01/app/12.1.0/grid "CLUSTER_NEW_NODES={collabn2,collabn3,collabn4}" "CLUSTER_NEW_VIRTUAL_HOSTNAMES={collabn2-vip,collabn3-vip,collabn4-vip}" Starting Oracle Universal Installer... Checking Temp space: must be greater than 120 MB. Actual 6125 MB Passed Checking swap space: must be greater than 150 MB. Actual 3017 MB Passed [WARNING] [INS-13014] Target environment does not meet some optional requirements. CAUSE: Some of the optional prerequisites are not met. See logs for details. /u01/app/oraInventory/logs/addNodeActions2014-02-18_03-43-22PM.log ACTION: Identify the list of failed prerequisite checks from the log: /u01/app/oraInventory/logs/addNodeActions2014-02-18_03-43-22PM.log. Then either from the log file or from installation manual find the appropriate configuration to meet the prerequisites and fix it manually. Prepare Configuration in progress. Prepare Configuration successful. .................................................. 40% Done. As a root user, execute the following script(s): 1. /u01/app/12.1.0/grid/root.sh Execute /u01/app/12.1.0/grid/root.sh on the following nodes: [collabn2,collabn3,collabn4] The scripts can be executed in parallel on all the nodes. If there are any policy managed databases managed by cluster, proceed with the addnode procedure without executing the root.sh script. Ensure that root.sh script is executed after all the policy managed databases managed by clusterware are extended to the new nodes. .................................................. 60% Done. Update Inventory in progress. .................................................. 100% Done. Update Inventory successful. Successfully Setup Software. |
- from the first server copy these files on all the other nodes:
|
1 2 3 |
scp -rp /u01/app/12.1.0/grid/crs/install/crsconfig_addparams collabn2:/u01/app/12.1.0/grid/crs/install/crsconfig_addparams scp -rp /u01/app/12.1.0/grid/crs/install/crsconfig_params collabn2:/u01/app/12.1.0/grid/crs/install/crsconfig_params scp -rp /u01/app/12.1.0/grid/gpnp collabn2:/u01/app/12.1.0/grid/gpnp |
- Then clone also the DB Home (again, run it on each new server and specify the same DB home name that you have used in the original installation):
|
1 2 3 4 5 6 7 8 9 10 11 12 13 14 15 16 17 18 19 20 21 22 23 24 25 26 27 28 29 30 31 32 33 34 35 36 37 38 39 40 41 42 43 44 45 46 47 48 49 50 51 52 53 54 55 56 57 |
[oracle@collabn2 bin]$ perl clone.pl -O 'CLUSTER_NODES={collabn1,collabn2,collabn3,collabn4}' -O LOCAL_NODE=collabn2 ORACLE_BASE=/u01/app/oracle ORACLE_HOME=/u01/app/oracle/product/12.1.0/dbhome_1 ORACLE_HOME_NAME=OraDB12Home1 -O -noConfig ./runInstaller -clone -waitForCompletion "CLUSTER_NODES={collabn1,collabn2,collabn3,collabn4}" "LOCAL_NODE=collabn2" "ORACLE_BASE=/u01/app/oracle" "ORACLE_HOME=/u01/app/oracle/product/12.1.0/dbhome_1" "ORACLE_HOME_NAME=OraDB12Home1" -noConfig -silent -paramFile /u01/app/oracle/product/12.1.0/dbhome_1/clone/clone_oraparam.ini Starting Oracle Universal Installer... Checking Temp space: must be greater than 500 MB. Actual 3896 MB Passed Checking swap space: must be greater than 500 MB. Actual 3005 MB Passed Preparing to launch Oracle Universal Installer from /tmp/OraInstall2014-02-18_05-22-22PM. Please wait ...You can find the log of this install session at: /u01/app/oraInventory/logs/cloneActions2014-02-18_05-22-22PM.log .................................................. 5% Done. .................................................. 10% Done. .................................................. 15% Done. .................................................. 20% Done. .................................................. 25% Done. .................................................. 30% Done. .................................................. 35% Done. .................................................. 40% Done. .................................................. 45% Done. .................................................. 50% Done. .................................................. 55% Done. .................................................. 60% Done. .................................................. 65% Done. .................................................. 70% Done. .................................................. 75% Done. .................................................. 80% Done. .................................................. 85% Done. .................................................. 90% Done. .................................................. 95% Done. Copy files in progress. Copy files successful. Link binaries in progress. Link binaries successful. Setup files in progress. Setup files successful. Setup Inventory in progress. Setup Inventory successful. Finish Setup in progress. Finish Setup successful. The cloning of OraDB12Home1 was successful. Please check '/u01/app/oraInventory/logs/cloneActions2014-02-18_05-22-22PM.log' for more details. As a root user, execute the following script(s): 1. /u01/app/oracle/product/12.1.0/dbhome_1/root.sh Execute /u01/app/oracle/product/12.1.0/dbhome_1/root.sh on the following nodes: [collabn2] .................................................. 100% Done. |
- On each new node run also the updatenodelist and the DB root.sh command to update the node list for the DB home:
|
1 |
./runInstaller -updateNodeList ORACLE_HOME=/u01/app/oracle/product/12.1.0/dbhome_1 -O "CLUSTER_NODES={collabn1,collabn2,collabn3,collabn4}" |
|
1 |
# /u01/app/oracle/product/12.1.0/dbhome_1/root.sh |
- and finally, run the GI root.sh on each new node to finalize their inclusion in the cluster!! 🙂
|
1 2 3 4 5 6 7 8 9 10 11 12 13 14 15 16 17 18 19 20 21 22 23 24 25 26 27 28 29 30 31 32 33 34 35 36 37 38 39 40 41 42 43 44 45 46 47 48 49 50 51 52 53 54 55 56 57 58 59 60 61 62 63 64 65 66 67 68 69 70 71 72 73 74 75 76 77 78 79 80 81 82 83 84 85 86 |
[root@collabn2 grid]# ./root.sh Performing root user operation for Oracle 12c The following environment variables are set as: ORACLE_OWNER= oracle ORACLE_HOME= /u01/app/12.1.0/grid Copying dbhome to /usr/local/bin ... Copying oraenv to /usr/local/bin ... Copying coraenv to /usr/local/bin ... Entries will be added to the /etc/oratab file as needed by Database Configuration Assistant when a database is created Finished running generic part of root script. Now product-specific root actions will be performed. Relinking oracle with rac_on option Using configuration parameter file: /u01/app/12.1.0/grid/crs/install/crsconfig_p 2014/02/18 17:34:00 CLSRSC-363: User ignored prerequisites during installation OLR initialization - successful 2014/02/18 17:34:47 CLSRSC-330: Adding Clusterware entries to file 'oracle-ohasd CRS-4133: Oracle High Availability Services has been stopped. CRS-4123: Oracle High Availability Services has been started. CRS-4133: Oracle High Availability Services has been stopped. CRS-4123: Oracle High Availability Services has been started. CRS-2791: Starting shutdown of Oracle High Availability Services-managed resources on 'collabn2' CRS-2673: Attempting to stop 'ora.drivers.acfs' on 'collabn2' CRS-2677: Stop of 'ora.drivers.acfs' on 'collabn2' succeeded CRS-2793: Shutdown of Oracle High Availability Services-managed resources on 'collabn2' has completed CRS-4133: Oracle High Availability Services has been stopped. CRS-4123: Starting Oracle High Availability Services-managed resources CRS-2672: Attempting to start 'ora.mdnsd' on 'collabn2' CRS-2672: Attempting to start 'ora.evmd' on 'collabn2' CRS-2676: Start of 'ora.mdnsd' on 'collabn2' succeeded CRS-2676: Start of 'ora.evmd' on 'collabn2' succeeded CRS-2672: Attempting to start 'ora.gpnpd' on 'collabn2' CRS-2676: Start of 'ora.gpnpd' on 'collabn2' succeeded CRS-2672: Attempting to start 'ora.gipcd' on 'collabn2' CRS-2676: Start of 'ora.gipcd' on 'collabn2' succeeded CRS-2672: Attempting to start 'ora.cssdmonitor' on 'collabn2' CRS-2676: Start of 'ora.cssdmonitor' on 'collabn2' succeeded CRS-2672: Attempting to start 'ora.cssd' on 'collabn2' CRS-2672: Attempting to start 'ora.diskmon' on 'collabn2' CRS-2676: Start of 'ora.diskmon' on 'collabn2' succeeded CRS-2789: Cannot stop resource 'ora.diskmon' as it is not running on server 'collabn2' CRS-2676: Start of 'ora.cssd' on 'collabn2' succeeded CRS-2672: Attempting to start 'ora.cluster_interconnect.haip' on 'collabn2' CRS-2672: Attempting to start 'ora.ctssd' on 'collabn2' CRS-2676: Start of 'ora.ctssd' on 'collabn2' succeeded CRS-2676: Start of 'ora.cluster_interconnect.haip' on 'collabn2' succeeded CRS-2672: Attempting to start 'ora.asm' on 'collabn2' CRS-2676: Start of 'ora.asm' on 'collabn2' succeeded CRS-2672: Attempting to start 'ora.storage' on 'collabn2' CRS-2676: Start of 'ora.storage' on 'collabn2' succeeded CRS-2672: Attempting to start 'ora.crf' on 'collabn2' CRS-2676: Start of 'ora.crf' on 'collabn2' succeeded CRS-2672: Attempting to start 'ora.crsd' on 'collabn2' CRS-2676: Start of 'ora.crsd' on 'collabn2' succeeded CRS-6017: Processing resource auto-start for servers: collabn2 CRS-2672: Attempting to start 'ora.ASMNET1LSNR_ASM.lsnr' on 'collabn2' CRS-2673: Attempting to stop 'ora.LISTENER_SCAN1.lsnr' on 'collabn1' CRS-2672: Attempting to start 'ora.ons' on 'collabn2' CRS-2677: Stop of 'ora.LISTENER_SCAN1.lsnr' on 'collabn1' succeeded CRS-2673: Attempting to stop 'ora.scan1.vip' on 'collabn1' CRS-2677: Stop of 'ora.scan1.vip' on 'collabn1' succeeded CRS-2672: Attempting to start 'ora.scan1.vip' on 'collabn2' CRS-2676: Start of 'ora.scan1.vip' on 'collabn2' succeeded CRS-2672: Attempting to start 'ora.LISTENER_SCAN1.lsnr' on 'collabn2' CRS-2676: Start of 'ora.ons' on 'collabn2' succeeded CRS-2676: Start of 'ora.ASMNET1LSNR_ASM.lsnr' on 'collabn2' succeeded CRS-2672: Attempting to start 'ora.asm' on 'collabn2' CRS-2676: Start of 'ora.LISTENER_SCAN1.lsnr' on 'collabn2' succeeded CRS-2676: Start of 'ora.asm' on 'collabn2' succeeded CRS-2672: Attempting to start 'ora.proxy_advm' on 'collabn2' CRS-2676: Start of 'ora.proxy_advm' on 'collabn2' succeeded CRS-6016: Resource auto-start has completed for server collabn2 CRS-6024: Completed start of Oracle Cluster Ready Services-managed resources CRS-4123: Oracle High Availability Services has been started. 2014/02/18 17:40:16 CLSRSC-343: Successfully started Oracle clusterware stack clscfg: EXISTING configuration version 5 detected. clscfg: version 5 is 12c Release 1. Successfully accumulated necessary OCR keys. Creating OCR keys for user 'root', privgrp 'root'.. Operation successful. 2014/02/18 17:40:38 CLSRSC-325: Configure Oracle Grid Infrastructure for a Cluster ... succeeded |
- As result, you should be able to seen all the cluster resources started correctly on all the nodes.
|
1 2 3 4 5 6 7 8 9 10 11 12 13 14 15 16 17 18 19 20 21 22 23 24 25 26 27 28 29 30 31 32 33 34 35 36 37 38 39 40 41 42 43 44 45 46 47 48 49 50 51 52 53 54 55 56 57 58 59 60 61 62 63 64 65 66 67 68 69 70 71 72 73 |
[oracle@collabn4 ~]$ crsctl stat res -t -------------------------------------------------------------------------------- Name Target State Server State details -------------------------------------------------------------------------------- Local Resources -------------------------------------------------------------------------------- ora.ASMNET1LSNR_ASM.lsnr ONLINE ONLINE collabn1 STABLE ONLINE ONLINE collabn2 STABLE ONLINE ONLINE collabn3 STABLE OFFLINE OFFLINE collabn4 STABLE ora.DATA.dg ONLINE ONLINE collabn1 STABLE ONLINE ONLINE collabn2 STABLE ONLINE ONLINE collabn3 STABLE OFFLINE OFFLINE collabn4 STABLE ora.LISTENER.lsnr ONLINE ONLINE collabn1 STABLE ONLINE ONLINE collabn2 STABLE ONLINE ONLINE collabn3 STABLE ONLINE ONLINE collabn4 STABLE ora.net1.network ONLINE ONLINE collabn1 STABLE ONLINE ONLINE collabn2 STABLE ONLINE ONLINE collabn3 STABLE ONLINE ONLINE collabn4 STABLE ora.ons ONLINE ONLINE collabn1 STABLE ONLINE ONLINE collabn2 STABLE ONLINE ONLINE collabn3 STABLE ONLINE ONLINE collabn4 STABLE ora.proxy_advm ONLINE ONLINE collabn1 STABLE ONLINE ONLINE collabn2 STABLE ONLINE ONLINE collabn3 STABLE ONLINE ONLINE collabn4 STABLE -------------------------------------------------------------------------------- Cluster Resources -------------------------------------------------------------------------------- ora.LISTENER_SCAN1.lsnr 1 ONLINE ONLINE collabn2 STABLE ora.LISTENER_SCAN2.lsnr 1 ONLINE ONLINE collabn3 STABLE ora.LISTENER_SCAN3.lsnr 1 ONLINE ONLINE collabn1 STABLE ora.MGMTLSNR 1 ONLINE ONLINE collabn1 169.254.159.216 172. 16.100.51,STABLE ora.asm 1 ONLINE ONLINE collabn1 STABLE 2 ONLINE ONLINE collabn2 STABLE 3 ONLINE ONLINE collabn3 STABLE ora.cvu 1 ONLINE ONLINE collabn1 STABLE ora.mgmtdb 1 ONLINE ONLINE collabn1 Open,STABLE ora.oc4j 1 ONLINE ONLINE collabn1 STABLE ora.collabn1.vip 1 ONLINE ONLINE collabn1 STABLE ora.collabn2.vip 1 ONLINE ONLINE collabn2 STABLE ora.collabn3.vip 1 ONLINE ONLINE collabn3 STABLE ora.collabn4.vip 1 ONLINE ONLINE collabn4 STABLE ora.scan1.vip 1 ONLINE ONLINE collabn2 STABLE ora.scan2.vip 1 ONLINE ONLINE collabn3 STABLE ora.scan3.vip 1 ONLINE ONLINE collabn1 STABLE -------------------------------------------------------------------------------- |
I know it seems a little complex, but if you have several nodes this is dramatically faster than the standard installation and also the space used is reduced. This is good if you have invested in a high-performance but low-capacity SSD disk like I did :-(.
Hope it helps, I paste here the official documentation links that I’ve used to clone the installations. The other steps are my own work.
References
- Oracle® Clusterware Administration and Deployment Guide 12c Release 1 (12.1) 7 Cloning Oracle Clusterware
- Oracle® Real Application Clusters Administration and Deployment Guide 12c Release 1 (12.1) 9 Using Cloning to Extend Oracle RAC to Nodes in the Same Cluster
Latest posts by Ludovico (see all)
- New views in Oracle Data Guard 23c - January 3, 2024
- New in Data Guard 21c and 23c: Automatic preparation of the primary - December 22, 2023
- Does FLASHBACK QUERY work across incarnations or after a Data Guard failover? - December 13, 2023
Hi Ludo – Great stuff! I didn’t know about the “Linked clone” option until reading this.
🙂 thank you Martin!
Hi Ludovico,
I’ve applied this to setup a 11g RAC lab. I had to make everything clean at the end with /crs/config/config.sh because I finished with +ASM1 on node2 which was not very nice. I don’t now if I messed something or if it is because of 11g.
But finally: 12GB for the first node, 2GB for each other nodes. cool.
Thanks a lot for sharing your really helpful work,
Franck.
great stuff on thin clone RAC provisioning. Thanks for outlining this!
Best
Kyle
Thank for the kind comment, Kyle 🙂
thanks, great info
Pingback: RAC Attack 12c at Collaborate 14 and advanced labs | DBA survival BLOG
Pingback: Multinode RAC 12c cluster on VirtualBox using linked clones - Ludovico Caldara - Blogs - triBLOG
Ludo,
This is amazing! I would love to see this become a lab for RACAttack. Were you running these all on local storage or on an attached external drive?
Cheers,
Maaz
Hi Maaz, thank you for the comment! I’ve added am internal SSD disk (Samsung 840 Pro) as replacement of my laptop’s DVD drive. It’s really fast compared to my internal 5400RPM, but small to host the 9 VMs I’m working on, so I’ve found my way to make a better use of it! 🙂
About the lab for RAC Attack… why not? I think I can convert it to a paper with a small effort. Thank you for the idea
Cheers
—
Ludo