Multitenant Pills – Change DBID for an existing PDB

When you plug the same PDB many times you have to specify “AS COPY” in the syntax:

Otherwise, you will get an error similar to:

There are cases, however, where you cannot do it. For example, it the existing PDB should have been the clone, or if you are converting a copy of the same database from Non-CDB to PDB using autoupgrade (with autoupgrade you cannot modify the CREATE PLUGGABLE DATABASE statement).

In this case, the solution might be to change the DBID of the existing PDB, via unplug/plug:


EDIT 2024-01-03: If you use Transparent Data Encryption, you have to export the key before you can unplug the PDB, or you will encounter:

Before closing the PDB, just run:

After opening the PDB, you’ll need to import the key again:

Don’t forget to keep your master key exports in a secure place.

Ludo

Parallel Oracle Catalog/Catproc creation with catpcat.sql

With Oracle 19c, Oracle has released a new script, annotated for parallel execution, to create the CATALOG and CATPROC in parallel at instance creation.

I have a customer who is in the process of migrating massively to Multitenant using many CDBs, so I decided to give it a try to check how much time they could save for the CDB creations.

I have run the tests on my laptop, on a VirtualBox VM with 4 vCPUs.

Test 1: catalog.sql + catproc.sql

In this test, I use the classic way (this is also the case when DBCA creates the scripts):

The catalog is created first on CDB$ROOT and PDB$SEED. Then the catproc is created.

Looking at the very first occurrence of BEGIN_RUNNING (start of catalog for CDB$ROOT) and the very last of END_RUNNING in the log (end of catproc in PDB$SEED), I can see that it took ~ 44 minutes to complete:


Test 2: catpcat.sql

In this test, I use the new catpcat.sql using catctl.pl, with a parallelism of 4 processes:

This creates catalog and catproc first on CDB$ROOT, than creates them on PDB$SEED. So, same steps but in different orders.

By running vmstat in the background, I noticed during the run that most of the time the creation was running serially, and when there was some parallelism, it was short and compensated by a lot of process synchronizations (waits, sleeps) done by the catctl.pl.

At the end, the process took ~ 45 minutes to complete.

So the answer is no: it is not faster to run catpcat.sql with parallel degree 4 compared to running catalog.sql and catproc.sql serially.

HTH

Ludo

Understand your Database through graphs

During the last months I have had to deal with highly consolidated databases, where there was no basic rule to achieve something maintainable. Over many years (some schemas are 30 years old) the number of schemas and their dependencies became a problem up to a point where basic operations like patching or upgrading were very complex to achieve.

In order to try to split these big databases and move towards Oracle Multitenant, I have created some graphs that helped me and my colleagues to understand the connections between schemas (grants) and databases (db links).


How  have I created the graphs?

I used Gephi , an open source software to generate graphs. Gephi is very powerful, I feel I have used just 1% of its capabilities.

How to create a graph, depends mostly on what you want to achieve and which data you have.

First, some basic terminology: Nodes are the “dots” in the graph, Edges are the lines connecting the dots. Both nodes and edges can have properties (e.g. edges have weight), but you might not need any.

Basic nodes and edges without properties

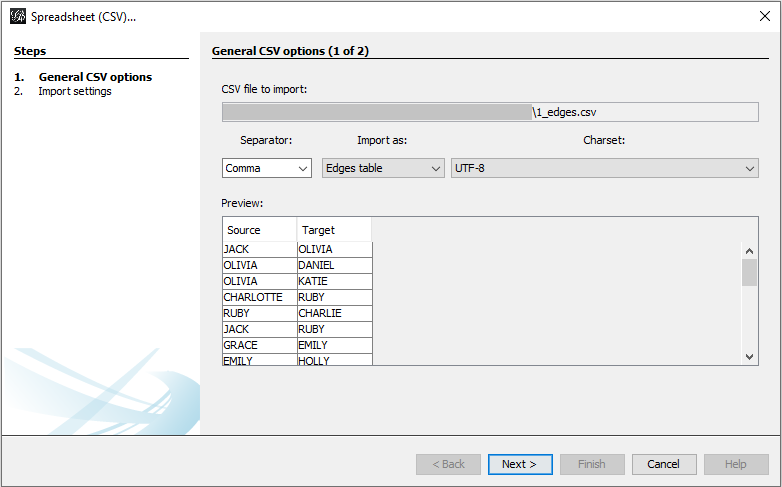
If you need just to show the dependencies between nodes, a basic edge list with source->target will be enough.

For example, you can have a edge list like this one: gephi_1_edges.csv

Open Gephi, go to New ProjectFile -> Import Spreadsheet, select the file. If you already have a workspace and you want to add the edges to the same workspace, select Append to existing workspace.

This will lead to something very basic:

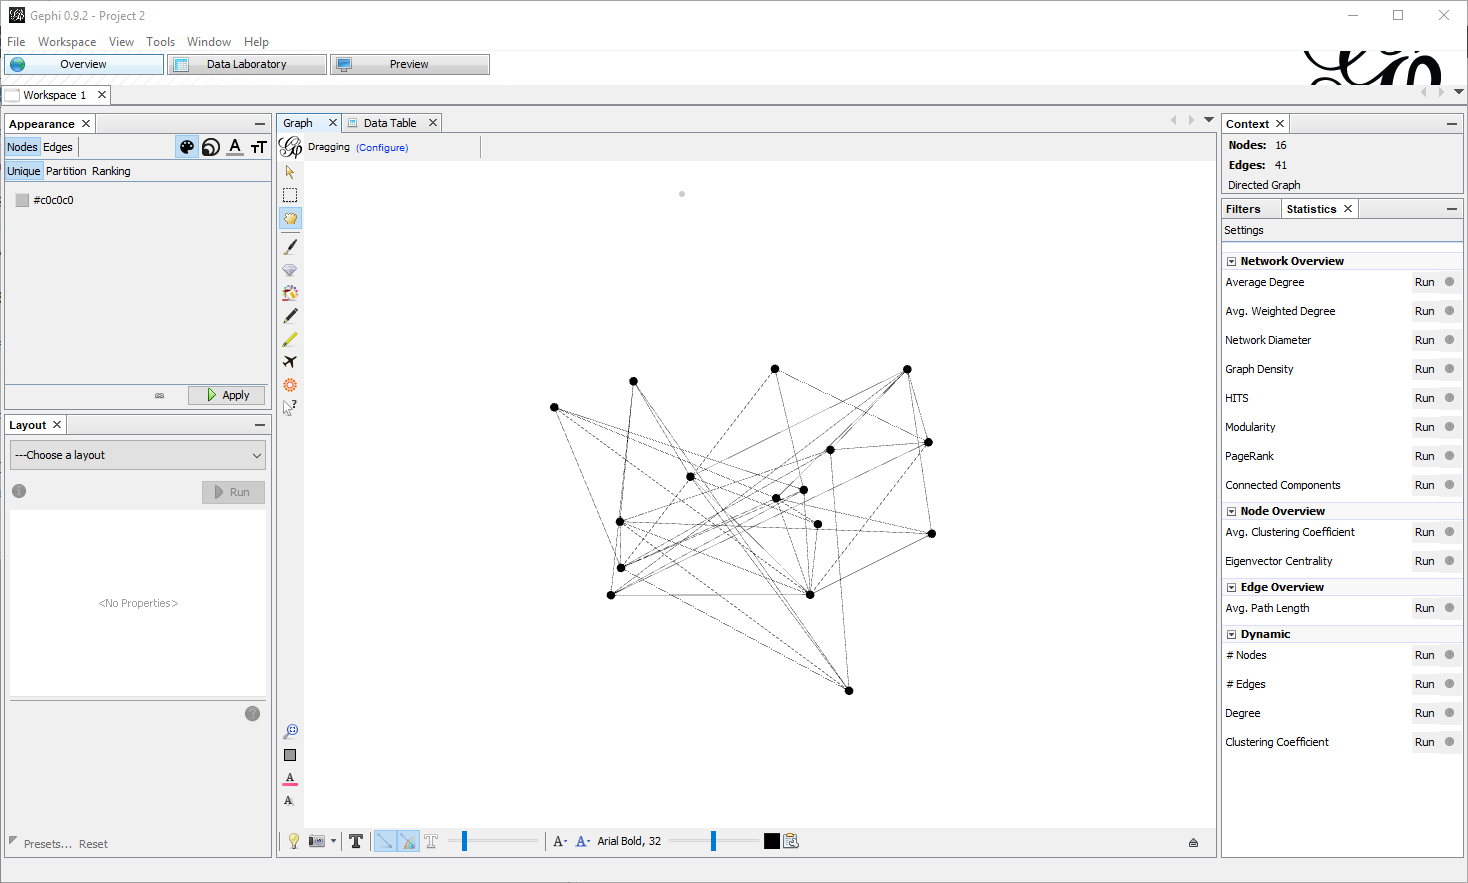
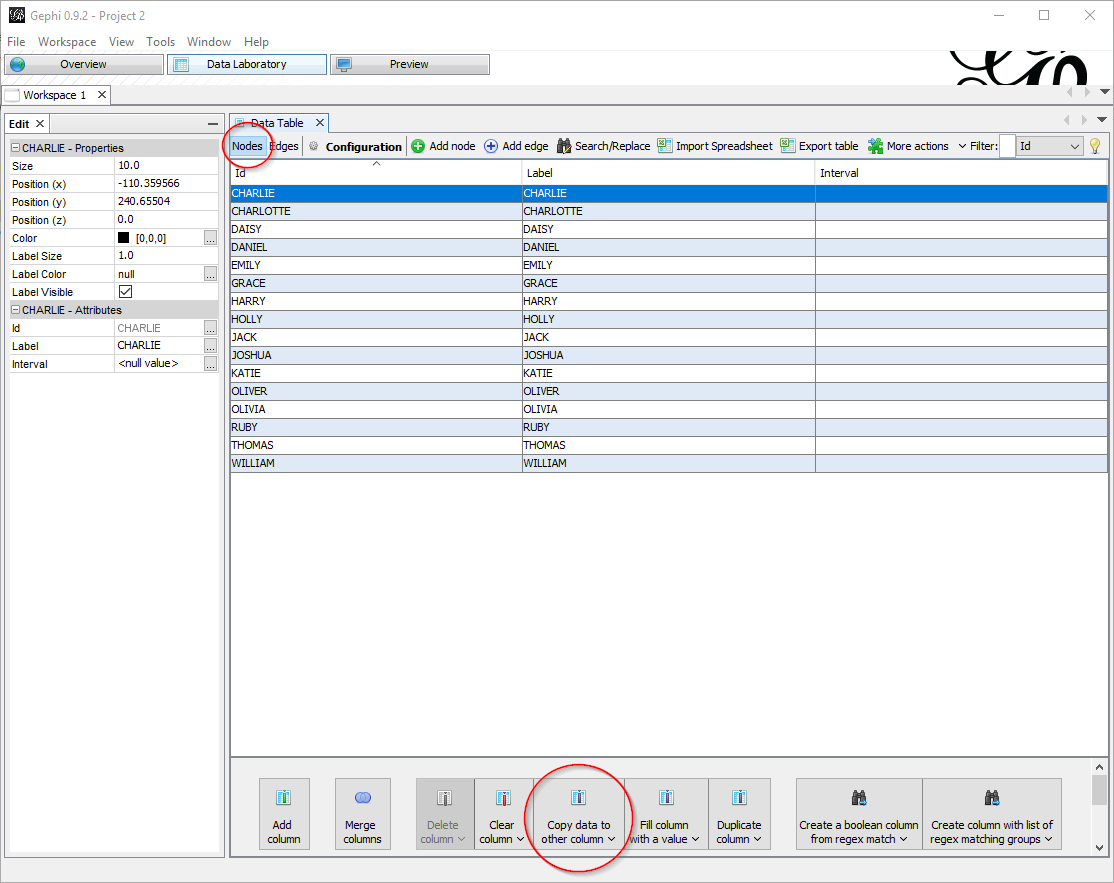
In the Data Laboratory tab, you might want to copy the value of the ID column to the label column, so that they match:

Now you must care about two things:

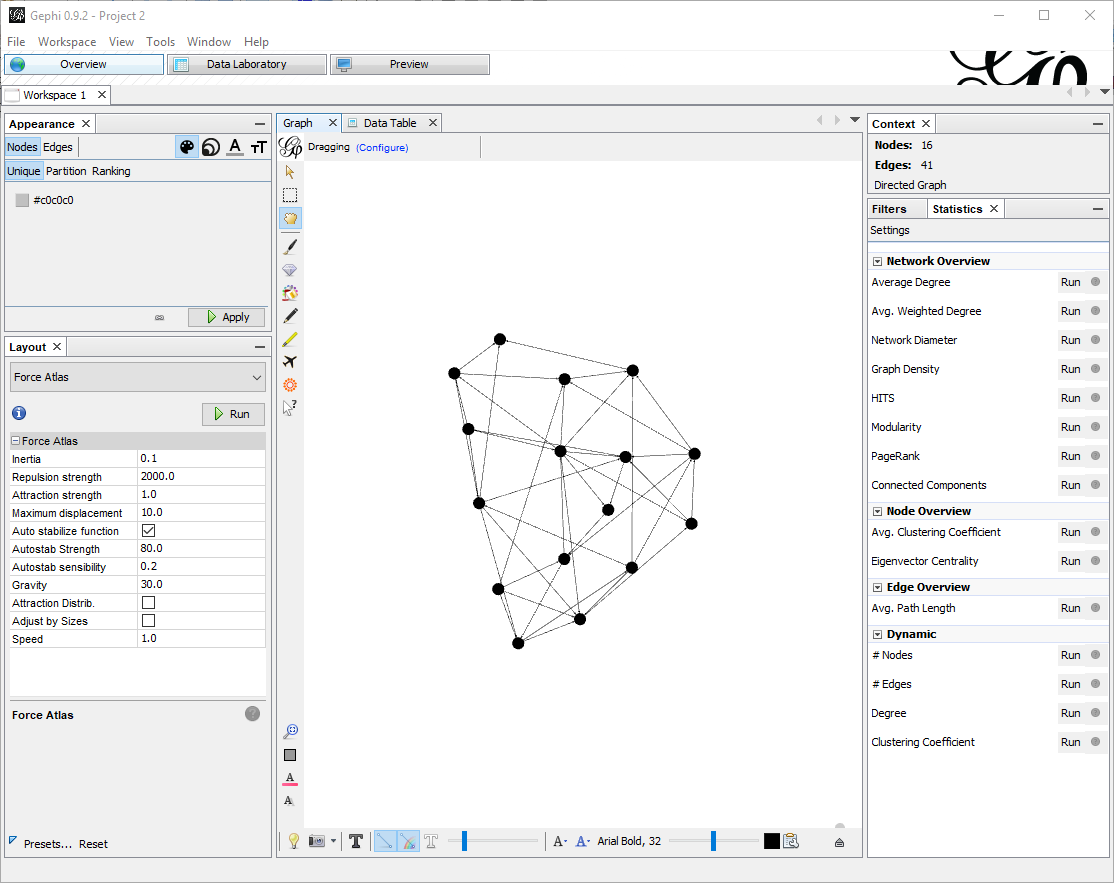
First, re-arranging the nodes. With few nodes this is often not required, but when there are many, the default visualization is not satisfying. In the tab Overview , pane Layout there are a few algorithms you can choose. For big graphs I prefer Force Atlas. There are a few parameters to tune, especially  the attraction/repulsion strengths and the gravity. Speed is also crucial if you have many nodes. For this small example I put Repulsion Strength to 2000, Attraction Strength to 1. Clicking on Run starts the algorithm to rearrange the nodes, which with few edges will almost instantaneous (don’t forget to stop it afterwards).

Here is what I get:

Now that the nodes are in place, in the preview pane I can adjust the settings, like showing labels and changing colors. Also, in the Appearance pane I can change the scheme to have for example colors based on ranking.

In this example, I choose to color based on ranking (nodes with more edges are darker).

I also set the Preset Default Straight, Show labels (with smaller size) , proportional size.

Adding nodes properties

Importing edges from CSV gives only a dumb list of edges, without any information about nodes properties. Having properties set might be important in order to change how the graph is displayed.

By importing a node list containing the properties of each node , I can add important information. In this example file, I have columns Id, Label and Sex, that I will use to color the nodes differently: gephi_1_nodes.csv

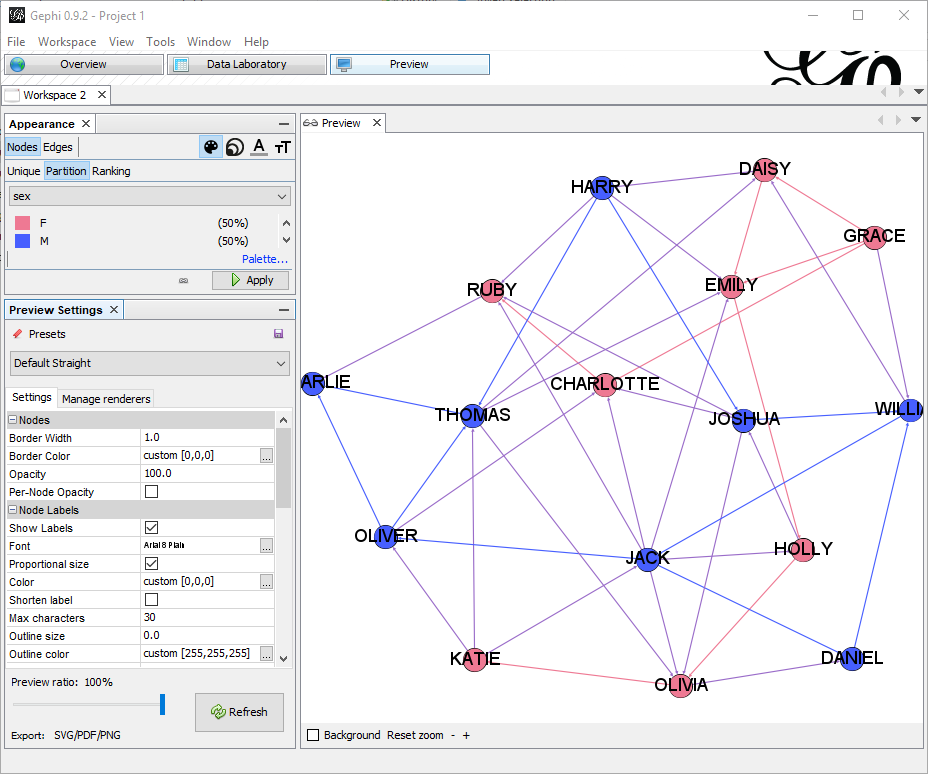
In the appearance node, I have just selected to partition by sex with a meaningful color.

Using real metadata to understand schemas or dependencies…

I will take, as an example, the dependencies in a database between objects of type VIEW, MATERIALIZED VIEW and TABLE. The database has quite a usage of materialized views and understanding the relation is not always easy.

This is the query that interests me:

So I need the nodes, for that I need a UNION to get nodes from both sides of the dependency. The best tool to achieve this is SqlCl as it has the native CSV output format:

The edge list:

Using the very same procedure as above, it is easy to generate the graph.

I am interested in understanding what is TABLE, what is VIEW and what MATERIALIZED VIEW, so I partition the color by type. I also set the edge color to source so the edge will have the same color of the source node type.

I am also interested in highlighting which tables have more incoming dependencies, so I rank the node size by In-Degree.


In the graph:

  • All the red dots are MVIEWS
  • All the blue dots are VIEWS
  • All the black dots are TABLES
  • All the red lines are dependencies between a MVIEW and a  (TABLE|VIEW).
  • All the blue lines are dependencies between a VIEW and a  (TABLE|MVIEW).
  • The bigger the dots, the more incoming dependencies.

With the same approach I can get packages, grants, roles, db_links, client-server dependencies, etc. to better understand the infrastructure.

I hope you like it!

ORA-02002 and ORA-00942 while upgrading OWM to 19c

This is a quick post about a problem that we have had while upgrading a DB to 19c.

At 91% of the upgrade, the OWM (Workspace Manager) upgrade was failing with this error error:

Indeed, executing the statement was leading consistently to this problem:

and we have had this result:

So, resuming the autoupgrade job was not a solution.

The view definition is:

but the package wmsys.ltUtil is wrapped, so no chance to understand what was happening.

As a quick fix, we have recompiled the binaries with mixed auditing:

and put the audit_trail=DB in the upgrade pfile (was NONE in this specific case).

After that, restarted the DB in upgrade mode using the same pfile.

After that, the view was giving no errors anymore and we resumed the autoupgrade job.

This is an old troubleshooting method that I call “Database Administration by guess”: I am not sure about the real cause, but the workaround just worked fine for us.

It would be interesting to know if anyone of you have had the same problem, and what were the auditing parameters in your case…

Ludovico

Duplicating a DB and setting up Data Guard through CMAN and SSH tunnel

I am fascinated about the new Zero Downtime Migration tool that has been available since November 28th. Whilst I am still in the process of testing it, there is one big requirement that might cause some headache to some customers. It is about network connectivity:

Configuring Connectivity Between the Source and Target Database Servers

The source database server […] can connect to target database instance over target SCAN through the respecitve scan port and vice versa.
The SCAN of the target should be resolvable from the source database server, and the SCAN of the source should resolve from the target server.
Having connectivity from both sides, you can synchronize between the source database and target database from either side. […]

If you are taking cloud migrations seriously, you should have either a VPN site-to-site to the cloud, or a Fast Connect link. At CERN we are quite lucky to have a high bandwidth Fast Connect to OCI Frankfurt.

This requirement might be missing for many customers, so what is a possible solution to setup connectivity for database duplicates and Data Guard setups?

In the picture above you can see a classic situation, that usually has two problems that must be solved:

  • the SCAN addresses are private: not accessible from internet
  • there are multiple SCAN addresses, so tunneling through all of them might be complex

Is it possible to configure CMAN in front of the SCAN listener as a single IP entry and tunnel through SSH to this single IP?

I will show now how to achieve this configuration.

For sake of simplicity, I have put two single instances without SCAN and a CMAN installation on the database servers, but it will work with little modification using SCAN and RAC setups as well. Note that in a Cloud Infrastructure setup, this will require a correct setup of the TDE wallet on both the source and the destination.

Because I put everything on s single host, I have to setup CMAN to listen to another port, but having a separate host for CMAN is a better practice when it has to proxy to SCAN listeners.

Installing and configuring CMAN

The most important part of the whole setup is that the CMAN on the standby site must have a public IP address and open SSH port so that we can tunnel through it.

The on-premises CMAN must have open access to the standby CMAN port 22.

For both primary and standby site you can follow the instructions of my blog post: Install and configure CMAN 19c in the Oracle Cloud, step by step.

In my example, because I install CMAN on the same host of the DB, I configure CMAN to run on port 1522.

CMAN primary config:

CMAN standby config:

This configuration is not secure at all, you might want to secure it further in order to allow only the services needed for setting up Data Guard.

The registration of database services to CMAN through the the remote_listener parameter is optional, as I will register the entries statically in the listener and use a routed connection through CMAN.

Listener configuration

The listener must have a static entry for the database, so that duplicate and switchover work properly.

On primary add to listener.ora:

On standby:

In a RAC config, all the local listeners must be configured with the correct SID_NAME running on the host. Make sure to reload the listeners 😉

Creating the SSH tunnels

There must be two tunnels open: one that tunnels from on-premises to the cloud and the other that tunnels from the cloud to on-premises.

However, such tunnels can both be created from the on-premises CMAN host that has access to the cloud CMAN host:

in my case, the hostnames are:

Important: with CMAN on a host other than the DB server, the CMAN sshd must be configured to have GatewayPorts set to yes:

After the tunnels are open, any connections to the local CMAN server port 1523 will be forwarded to the remote CMAN port 1522.

Configuring the TNSNAMES to hop through CMAN and SSH tunnel

Both servers must have now one entry for the local database pointing to the actual SCAN (or listener for single instances) and one entry for the remote database pointing to local port 1523 and routing to the remote scan.

On-premises tnsnames.ora:

Cloud tnsnames.ora:

After copying the passwordfile and starting nomount the cloud database, it should be possible from both sides to connect as SYSDBA to both DB_CLOUD and DB_ONPREM.

This configuration is ready for both duplicate from active database and for Data Guard.
I still have to figure out if it works with ZDM, but I think it is a big step towards establishing connection between on-premises and the Oracle Cloud when no VPN or Fast Connect are available.

Duplicate from active database

If the setup is correct, this should work:

Setting up Data Guard

  • Configure broker config files
  • Add and clear the standby logs
  • Start the broker
  • Create the configuration:

    The static connect identifier here is better if it uses the TNSNAMES resolution because each database sees each other differently.

Checking the DG config

A validate first:

Than a switchover, back and forth:

Conclusion

Yes, it is possible to setup a Data Guard between two sites that have no connections except mono-directional SSH. The SSH tunnels allow SQL*Net communication to a remote endpoint. CMAN allows to proxy through a single endpoint to multiple SCAN addresses.

However, do not forget about the ultimate goal that is to migrate your BUSINESS to the cloud, not just the database. Therefore, having a proper communication to the cloud with proper performance, architecture and security is crucial. Depending on your target Cloud database, Zero Downtime Migration or MV2ADB should be the correct and supported solutions.

Checking usage of HugePages by Oracle databases in Linux environments

Yesterday several databases on one server started logging errors in the alert log:

That means not enough contiguous free memory in the OS. The first thing that I have checked has been of course the memory, and the used huge pages:

The memory available (last column in the free command) was indeed quite low, but still plenty of space in the huge pages (86k pages free out of 180k).

The usage by Oracle instances:

You can get the code of mem.sh in this post.

Regarding pure shared memory usage, the situation was what I was expecting:

360G of shared memory usage, much more than what was allocated in the huge pages.

I have compared the situation with the other node in the cluster: it had more memory allocated by the databases (because of more load on it), more huge page usage and less 4k pages consumption overall.

So I was wondering if all the DBs were property allocating the SGA in huge pages or not.

This redhat page has been quite useful to create a quick snippet to check the huge page memory allocation per process:

It has been easy to spot the databases not using huge pages at all:

Indeed, after stopping them, the huge page usage has not changed:

But after starting them back I could see the new huge pages reserved/allocated:

The reason was that the server has been started without huge pages first, and after a few instances started, the huge pages has been set.

HTH

Ludovico


Parameter REMOTE_LISTENER pointing to a TNS alias? Beware of how it registers.

On an Oracle Database instance, if I set:

The instance tries to resolve the cluster-scan name to detect if it is a SCAN address.
So, after it solves, it stores all the addresses it gets and registers to them.
I can check which addresses there are with this query:

In this case, the instance registers to the three addresses discovered, which is OK: all three SCAN listeners will get service updates from the instance.

But if I have this TNS alias:

and I set:

I get:

the result is that the instance registers only at the first IP fot from the DNS, leaving the other SCANs without the service registration and thus random

This is in my opinion quite annoying, as my goal here was to have all the DBs set with:

in order to facilitate changes of ports, database migrations from different clusters, clones, etc.

So the solution is either to revert to the syntax “cluster-scan:port”, or specifying explicitly all the endpoints in the address list:

I am sure it is “working as designed”, but I wonder if it could be an enhancement to have the address expended fully also in case of TNS alias….
Or… do you know any way to do it from a TNS alias without having the full IP list?

Cheers

Ludo

Install and configure CMAN 19c in the Oracle Cloud, step by step

Installing and configuring CMAN is a trivial activity, but having the steps in one place is better than reinventing the wheel.

Prepare for the install

Download the Oracle Client 19.3.0.0 in the Oracle Database 19c download page.

Choose this one: LINUX.X64_193000_client.zip (64-bit) (1,134,912,540 bytes) , not the one named “LINUX.X64_193000_client_home.zip” because it is a preinstalled home that does not contain the CMAN tools.

Access the OCI Console and create a new Compute instance. The default  configuration is OK, just make sure that it is Oracle Linux 7 🙂

Do not forget to add your SSH Public Key to access the VM via SSH!

Access the VM using

Copy the Oracle Client zip in /tmp using your favorite scp program.

Install CMAN

Follow these steps to install CMAN:


Basic configuration

This will create a CMAN configuration named cman-test. Beware that it is very basic and insecure. Please read the CMAN documentation if you want something more secure or sophisticated.

The advantage of having the TNS_ADMIN outside the Oracle Home is that if you need to patch CMAN, you can do it out-of-place without the need to copy the configuration files somewhere else.

The advantage of using IFILE inside cman.ora, is that you can manage easily different CMAN configurations in the same host without editing directly cman.ora, with the risk of messing it up.

Preparing the start/stop script

Create a file /u01/app/oracle/scripts/cman_service.sh with this content:

This is at the same time ORACLE_HOME agnostic and configuration agnostic.

Make it executable:

and try to start CMAN:

Stop should work as well:

Add the service in systemctl

Open firewall ports

By default, new OL7 images use firewalld. Just open the port 1521 from the public zone:


Bonus: have a smart environment!

Ludo

FPP local-mode: Steps to remove/add node from a cluster if RHP fails to move gihome

I am getting more and more experience with patching clusters with the local-mode automaton. The whole process would be very complex, but the local-mode automaton makes it really easy.

I have had nevertheless a couple of clusters where the process did not work:

#1: The very first cluster that I installed in 18c

This cluster has “kind of failed” patching the first node. Actually, the rhpctl command exited with an error:

But actually, the helper kept running and configured everything properly:

The cluster was OK on the first node, with the correct patch level. The second node, however, was failing with:

I am not sure about the cause, but let’s assume it is irrelevant for the moment.

#2: A cluster with new GI home not properly linked with RAC

This was another funny case, where the first node patched successfully, but the second one failed upgrading in the middle of the process with a java NullPointer exception. We did a few bad tries of prePatch and postPatch to solve, but after that the second node of the cluster was in an inconsistent state: in ROLLING_UPGRADE mode and not possible to patch anymore.

Common solution: removing the node from the cluster and adding it back

In both cases we were in the following situation:

  • one node was successfully patched to 18.6
  • one node was not patched and was not possible to patch it anymore (at least without heavy interventions)

So, for me, the easiest solution has been removing the failing node and adding it back with the new patched version.

Steps to remove the node

Although the steps are described here: https://docs.oracle.com/en/database/oracle/oracle-database/18/cwadd/adding-and-deleting-cluster-nodes.html#GUID-8ADA9667-EC27-4EF9-9F34-C8F65A757F2A, there are a few differences that I will highlight:

Stop of the cluster:

The actual procedure to remove a node asks to deconfigure the databases and managed homes from the active cluster version. But as we manage our homes with golden images, we do not need this; we rather want to keep all the entries in the OCR so that when we add it back, everything is in place.

Once stopped the CRS, we have deinstalled the CRS home on the failing node:

This  complained about the CRS that was down, but it continued and ask for this script to be executed:

We’ve got errors also for this script, but the remove process was OK afterall.

Then, from the surviving node:

Adding the node back

From the surviving node, we ran gridSetup.sh and followed the steps to ad the node.

Wait before running root.sh.

In our case, we have originally installed the cluster starting with a SW_ONLY install. This type of installation keeps some leftovers in the configuration files that prevent the root.sh from configuring the cluster…we have had to modify rootconfig.sh:

then, after running root.sh and the config tools, everything was back as before removing the node form the cluster.

For one of the clusters , both nodes were at the same patch level, but the cluster was still in ROLLING_PATCH mode. So we have had to do a

Ludo

Oracle SW_ONLY install leads to relink with rac_off at every attachHome

OK, I really do not know what other title I should use for this post.

I have developed and presented a few times my personal approach to Oracle Home provisioning and patching. You can read more in this series.

With this approach:

  • I install the software (either GI or RDBMS) with the option SW_ONLY once
  • I patch it to the last version
  • I create a golden image that I evolve for the rest of the release lifecycle

When I need to install it, I just unzip the golden image and attach it to the Central Inventory.

I have discovered quite longtime ago that, every time I was attaching the home to the inventory, the binaries were relinked with rac_off, disregarding the fact that the home that I zipped actually had RAC enabled. This is quite annoying at my work at CERN, as all our databases are RAC.

So my solution to the problem is to detect if the server is on a cluster, and relink on the fly:

This is a simplified snippet of my actual code, but it gives the idea.

What causes the relink with rac_off?

I have discovered recently that the steps used by the runInstaller process to attach the Oracle Home are described in this file:

and in my case, for all my golden images, it contains:

So, it does not matter how I prepare my images: unless I change this file and put rac_on, the runInstaller keeps relinking with rac_off.

I have thought about changing the file, but then realized that I prefer to check and recompile at runtime, so I can reuse my images also for standalone servers (in case we need them).

Just to avoid surprises, it is convenient to check if a ORACLE_HOME is linked with RAC with this small function:

This is true especially for Grid Infrastructure golden images, as they have the very same behavior of RDBMS homes, with the exception that they might break out-of-place patching if RAC is not enabled: the second ASM instance will not mount because the first will be exclusively mounted without the RAC option.


HTH.

Ludovico