With Oracle 19c, Oracle has released a new script, annotated for parallel execution, to create the CATALOG and CATPROC in parallel at instance creation.
I have a customer who is in the process of migrating massively to Multitenant using many CDBs, so I decided to give it a try to check how much time they could save for the CDB creations.
I have run the tests on my laptop, on a VirtualBox VM with 4 vCPUs.
Test 1: catalog.sql + catproc.sql
In this test, I use the classic way (this is also the case when DBCA creates the scripts):
The catalog is created first on CDB$ROOT and PDB$SEED. Then the catproc is created.
Looking at the very first occurrence of BEGIN_RUNNING (start of catalog for CDB$ROOT) and the very last of END_RUNNING in the log (end of catproc in PDB$SEED), I can see that it took ~ 44 minutes to complete:
This creates catalog and catproc first on CDB$ROOT, than creates them on PDB$SEED. So, same steps but in different orders.
By running vmstat in the background, I noticed during the run that most of the time the creation was running serially, and when there was some parallelism, it was short and compensated by a lot of process synchronizations (waits, sleeps) done by the catctl.pl.
At the end, the process took ~ 45 minutes to complete.
and put the audit_trail=DB in the upgrade pfile (was NONE in this specific case).
After that, restarted the DB in upgrade mode using the same pfile.
After that, the view was giving no errors anymore and we resumed the autoupgrade job.
Oracle PL/SQL
1
2
3
SQL>select*fromwmsys.wm$migration_error_view;
norowsselected
This is an old troubleshooting method that I call “Database Administration by guess”: I am not sure about the real cause, but the workaround just worked fine for us.
It would be interesting to know if anyone of you have had the same problem, and what were the auditing parameters in your case…
I am fascinated about the new Zero Downtime Migration tool that has been available since November 28th. Whilst I am still in the process of testing it, there is one big requirement that might cause some headache to some customers. It is about network connectivity:
The source database server […] can connect to target database instance over target SCAN through the respecitve scan port and vice versa.
The SCAN of the target should be resolvable from the source database server, and the SCAN of the source should resolve from the target server.
Having connectivity from both sides, you can synchronize between the source database and target database from either side. […]
If you are taking cloud migrations seriously, you should have either a VPN site-to-site to the cloud, or a Fast Connect link. At CERN we are quite lucky to have a high bandwidth Fast Connect to OCI Frankfurt.
This requirement might be missing for many customers, so what is a possible solution to setup connectivity for database duplicates and Data Guard setups?
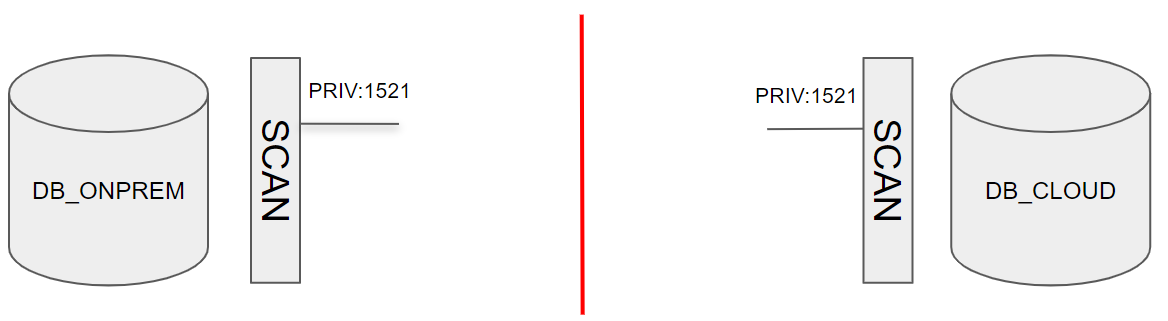
In the picture above you can see a classic situation, that usually has two problems that must be solved:
the SCAN addresses are private: not accessible from internet
there are multiple SCAN addresses, so tunneling through all of them might be complex
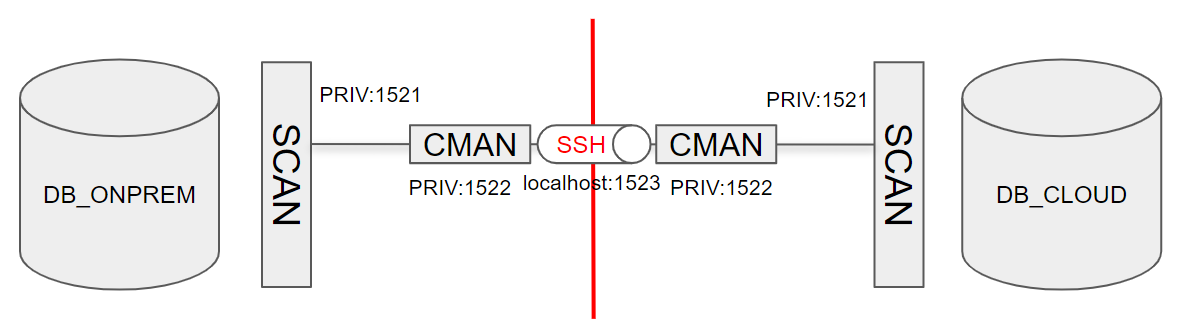
Is it possible to configure CMAN in front of the SCAN listener as a single IP entry and tunnel through SSH to this single IP?
I will show now how to achieve this configuration.
For sake of simplicity, I have put two single instances without SCAN and a CMAN installation on the database servers, but it will work with little modification using SCAN and RAC setups as well. Note that in a Cloud Infrastructure setup, this will require a correct setup of the TDE wallet on both the source and the destination.
Because I put everything on s single host, I have to setup CMAN to listen to another port, but having a separate host for CMAN is a better practice when it has to proxy to SCAN listeners.
Installing and configuring CMAN
The most important part of the whole setup is that the CMAN on the standby site must have a public IP address and open SSH port so that we can tunnel through it.
The on-premises CMAN must have open access to the standby CMAN port 22.
This configuration is not secure at all, you might want to secure it further in order to allow only the services needed for setting up Data Guard.
The registration of database services to CMAN through the the remote_listener parameter is optional, as I will register the entries statically in the listener and use a routed connection through CMAN.
Listener configuration
The listener must have a static entry for the database, so that duplicate and switchover work properly.
In a RAC config, all the local listeners must be configured with the correct SID_NAME running on the host. Make sure to reload the listeners 😉
Creating the SSH tunnels
There must be two tunnels open: one that tunnels from on-premises to the cloud and the other that tunnels from the cloud to on-premises.
However, such tunnels can both be created from the on-premises CMAN host that has access to the cloud CMAN host:
Shell
1
2
3
4
5
# bind local port 1523 to remote port 1522
ssh-NnTf cman-cloud-L1523:cman-cloud:1522
# bind remote port 1523 to local port 1522
ssh-NnTf cman-cloud-R1523:cman-onprem:1522
in my case, the hostnames are:
Shell
1
2
ssh-NnTf ludodb02-L1523:ludodb02:1522
ssh-NnTf ludodb02-R1523:ludodb01:1522
Important: with CMAN on a host other than the DB server, the CMAN sshd must be configured to have GatewayPorts set to yes:
Oracle PL/SQL
1
GatewayPortsyes
After the tunnels are open, any connections to the local CMAN server port 1523 will be forwarded to the remote CMAN port 1522.
Configuring the TNSNAMES to hop through CMAN and SSH tunnel
Both servers must have now one entry for the local database pointing to the actual SCAN (or listener for single instances) and one entry for the remote database pointing to local port 1523 and routing to the remote scan.
After copying the passwordfile and starting nomount the cloud database, it should be possible from both sides to connect as SYSDBA to both DB_CLOUD and DB_ONPREM.
This configuration is ready for both duplicate from active database and for Data Guard.
I still have to figure out if it works with ZDM, but I think it is a big step towards establishing connection between on-premises and the Oracle Cloud when no VPN or Fast Connect are available.
RMAN> duplicate target database for standby from active database ;
Setting up Data Guard
Configure broker config files
Add and clear the standby logs
Start the broker
Create the configuration:
Oracle PL/SQL
1
2
3
4
5
6
create configuration db as primary database is db_onprem connect identifier is 'db_onprem';
add database db_cloud as connect identifier is 'db_cloud';
edit database db_onprem set property StaticConnectIdentifier='db_onprem';
edit database db_cloud set property StaticConnectIdentifier='db_cloud';
enable configuration;
show configuration;
The static connect identifier here is better if it uses the TNSNAMES resolution because each database sees each other differently.
Checking the DG config
A validate first:
Oracle PL/SQL
1
2
3
4
5
6
7
8
9
10
11
12
13
14
15
16
17
18
19
20
21
22
23
24
25
26
27
28
29
30
31
DGMGRL> show configuration;
Configuration - db
Protection Mode: MaxPerformance
Members:
db_onprem - Primary database
db_cloud - Physical standby database
Fast-Start Failover: Disabled
Configuration Status:
SUCCESS (status updated 56 seconds ago)
DGMGRL> validate database db_cloud;
Database Role: Physical standby database
Primary Database: db_onprem
Ready for Switchover: Yes
Ready for Failover: Yes (Primary Running)
Flashback Database Status:
db_onprem: Off
db_cloud : Off
Managed by Clusterware:
db_onprem: NO
db_cloud : NO
Validating static connect identifier for the primary database db_onprem...
The static connect identifier allows for a connection to database "db_onprem".
Than a switchover, back and forth:
Oracle PL/SQL
1
2
3
4
5
6
7
8
9
10
11
12
13
14
15
16
17
18
19
20
21
22
23
24
25
26
27
28
29
30
31
32
33
34
35
36
37
38
39
40
41
42
43
44
DGMGRL> switchover to db_cloud;
Performing switchover NOW, please wait...
Operation requires a connection to database "db_cloud"
Connecting ...
Connected to "db_cloud"
Connected as SYSDBA.
New primary database "db_cloud" is opening...
Operation requires start up of instance "db" on database "db_onprem"
Starting instance "db"...
Connected to an idle instance.
ORACLE instance started.
Connected to "db_onprem"
Database mounted.
Connected to "db_onprem"
Switchover succeeded, new primary is "db_cloud"
DGMGRL> show configuration;
Configuration - db
Protection Mode: MaxPerformance
Members:
db_cloud - Primary database
db_onprem - Physical standby database
Fast-Start Failover: Disabled
Configuration Status:
SUCCESS (status updated 57 seconds ago)
DGMGRL> switchover to db_onprem;
Performing switchover NOW, please wait...
Operation requires a connection to database "db_onprem"
Connecting ...
Connected to "db_onprem"
Connected as SYSDBA.
New primary database "db_onprem" is opening...
Operation requires start up of instance "db" on database "db_cloud"
Starting instance "db"...
Connected to an idle instance.
ORACLE instance started.
Connected to "db_cloud"
Database mounted.
Connected to "db_cloud"
Switchover succeeded, new primary is "db_onprem"
Conclusion
Yes, it is possible to setup a Data Guard between two sites that have no connections except mono-directional SSH. The SSH tunnels allow SQL*Net communication to a remote endpoint. CMAN allows to proxy through a single endpoint to multiple SCAN addresses.
However, do not forget about the ultimate goal that is to migrate your BUSINESS to the cloud, not just the database. Therefore, having a proper communication to the cloud with proper performance, architecture and security is crucial. Depending on your target Cloud database, Zero Downtime Migration or MV2ADBshould be the correct and supported solutions.
Regarding pure shared memory usage, the situation was what I was expecting:
Oracle PL/SQL
1
2
$ ipcs -m | awk 'BEGIN{a=0} {a+=$5} END{print a}'
369394520064
360G of shared memory usage, much more than what was allocated in the huge pages.
I have compared the situation with the other node in the cluster: it had more memory allocated by the databases (because of more load on it), more huge page usage and less 4k pages consumption overall.
The instance tries to resolve the cluster-scan name to detect if it is a SCAN address.
So, after it solves, it stores all the addresses it gets and registers to them.
I can check which addresses there are with this query:
In this case, the instance registers to the three addresses discovered, which is OK: all three SCAN listeners will get service updates from the instance.
the result is that the instance registers only at the first IP fot from the DNS, leaving the other SCANs without the service registration and thus random
I am sure it is “working as designed”, but I wonder if it could be an enhancement to have the address expended fully also in case of TNS alias….
Or… do you know any way to do it from a TNS alias without having the full IP list?
Choose this one: LINUX.X64_193000_client.zip (64-bit) (1,134,912,540 bytes) , not the one named “LINUX.X64_193000_client_home.zip” because it is a preinstalled home that does not contain the CMAN tools.
Access the OCI Console and create a new Compute instance. The default configuration is OK, just make sure that it is Oracle Linux 7 🙂
Do not forget to add your SSH Public Key to access the VM via SSH!
Access the VM using
Oracle PL/SQL
1
ssh opc@{public_ip}
Copy the Oracle Client zip in /tmp using your favorite scp program.
Install CMAN
Follow these steps to install CMAN:
Oracle PL/SQL
1
2
3
4
5
6
7
8
9
10
11
12
13
14
15
16
17
18
19
20
21
22
23
24
25
26
27
28
29
30
31
32
33
34
35
36
37
38
39
40
41
42
43
# become root
sudo su - root
# install some prereqs (packages, oracle user, kernel params, etc.):
This will create a CMAN configuration named cman-test. Beware that it is very basic and insecure. Please read the CMAN documentation if you want something more secure or sophisticated.
The advantage of having the TNS_ADMIN outside the Oracle Home is that if you need to patch CMAN, you can do it out-of-place without the need to copy the configuration files somewhere else.
The advantage of using IFILE inside cman.ora, is that you can manage easily different CMAN configurations in the same host without editing directly cman.ora, with the risk of messing it up.
Preparing the start/stop script
Create a file /u01/app/oracle/scripts/cman_service.sh with this content:
I am getting more and more experience with patching clusters with the local-mode automaton. The whole process would be very complex, but the local-mode automaton makes it really easy.
I have had nevertheless a couple of clusters where the process did not work:
#1: The very first cluster that I installed in 18c
This cluster has “kind of failed” patching the first node. Actually, the rhpctl command exited with an error:
server1.cern.ch: retrieving status of databases ...
server1.cern.ch: retrieving status of services of databases ...
PRCT-1011 : Failed to run "rhphelper". Detailed error: <HLP_EMSG>,RHPHELP_procCmdLine-05,</HLP_EMSG>,<HLP_VRES>3</HLP_VRES>,<HLP_IEEMSG>,PRCG-1079 : Internal error: RHPHELP122_main-01,</HLP_IEEMSG>,<HLP_ERES>1</HLP_ERES>
I am not sure about the cause, but let’s assume it is irrelevant for the moment.
#2: A cluster with new GI home not properly linked with RAC
This was another funny case, where the first node patched successfully, but the second one failed upgrading in the middle of the process with a java NullPointer exception. We did a few bad tries of prePatch and postPatch to solve, but after that the second node of the cluster was in an inconsistent state: in ROLLING_UPGRADE mode and not possible to patch anymore.
Common solution: removing the node from the cluster and adding it back
In both cases we were in the following situation:
one node was successfully patched to 18.6
one node was not patched and was not possible to patch it anymore (at least without heavy interventions)
So, for me, the easiest solution has been removing the failing node and adding it back with the new patched version.
The actual procedure to remove a node asks to deconfigure the databases and managed homes from the active cluster version. But as we manage our homes with golden images, we do not need this; we rather want to keep all the entries in the OCR so that when we add it back, everything is in place.
Once stopped the CRS, we have deinstalled the CRS home on the failing node:
Oracle PL/SQL
1
(oracle)$ $OH/deinstall/deinstall -local
This complained about the CRS that was down, but it continued and ask for this script to be executed:
We’ve got errors also for this script, but the remove process was OK afterall.
Then, from the surviving node:
Oracle PL/SQL
1
2
3
root # crsctl delete node -n server2
oracle $ srvctl stop vip -vip server2
root $ srvctl remove vip -vip server2
Adding the node back
From the surviving node, we ran gridSetup.sh and followed the steps to ad the node.
Wait before running root.sh.
In our case, we have originally installed the cluster starting with a SW_ONLY install. This type of installation keeps some leftovers in the configuration files that prevent the root.sh from configuring the cluster…we have had to modify rootconfig.sh:
Oracle PL/SQL
1
2
3
4
5
check/modify /u01/crs/crs1860/crs/config/rootconfig.sh and change this:
# before:
# SW_ONLY=true
# after:
SW_ONLY=false
then, after running root.sh and the config tools, everything was back as before removing the node form the cluster.
For one of the clusters , both nodes were at the same patch level, but the cluster was still in ROLLING_PATCH mode. So we have had to do a
OK, I really do not know what other title I should use for this post.
I have developed and presented a few times my personal approach to Oracle Home provisioning and patching. You can read more in this series.
With this approach:
I install the software (either GI or RDBMS) with the option SW_ONLY once
I patch it to the last version
I create a golden image that I evolve for the rest of the release lifecycle
When I need to install it, I just unzip the golden image and attach it to the Central Inventory.
I have discovered quite longtime ago that, every time I was attaching the home to the inventory, the binaries were relinked with rac_off, disregarding the fact that the home that I zipped actually had RAC enabled. This is quite annoying at my work at CERN, as all our databases are RAC.
So my solution to the problem is to detect if the server is on a cluster, and relink on the fly:
Shell
1
2
3
4
5
6
7
8
9
10
11
12
13
14
15
### EARLIER, IN THE ENVIRONMENT SCRIPTS
if[-f/etc/oracle/olr.loc];then
export CRS_EXISTS=1
else
export CRS_EXISTS=0
fi
### LATER, AFTER ATTACHING THE ORACLE_HOME:
pushd$ORACLE_HOME/rdbms/lib
if[$CRS_EXISTS-eq1];then
make-fins_rdbms.mkrac_on
else
make-fins_rdbms.mkrac_off
fi
make-fins_rdbms.mkioracle
This is a simplified snippet of my actual code, but it gives the idea.
What causes the relink with rac_off?
I have discovered recently that the steps used by the runInstaller process to attach the Oracle Home are described in this file:
Oracle PL/SQL
1
$ORACLE_HOME/inventory/make/makeorder.xml
and in my case, for all my golden images, it contains:
So, it does not matter how I prepare my images: unless I change this file and put rac_on, the runInstaller keeps relinking with rac_off.
I have thought about changing the file, but then realized that I prefer to check and recompile at runtime, so I can reuse my images also for standalone servers (in case we need them).
Just to avoid surprises, it is convenient to check if a ORACLE_HOME is linked with RAC with this small function:
This is true especially for Grid Infrastructure golden images, as they have the very same behavior of RDBMS homes, with the exception that they might break out-of-place patching if RAC is not enabled: the second ASM instance will not mount because the first will be exclusively mounted without the RAC option.
I have been installing Grid Infrastructure 18c for a while, then switched to 19c when it became GA.
At the beginning I have been overly enthusiast by the shorter installation time:
Grid Infra 19c install process is MUCH faster than 18c/12cR2. Mean time for 2 node clusters @ CERN (incl. volumes, puppet runs, etc.) lowered from 1h30 to 45mins. No GIMR anymore by default!
The GIMR is now optional, that means that deciding to install it is a choice of the customer, and a customer might like to keep it or not, depending on its practices.
Not having the GIMR by default means not having the local-mode automaton. This is also not a problem at all. The default configuration is good for most customers and works really well.
This new simplified configuration reduces some maintenance effort at the beginning, but personally I use a lot the local-mode automaton for out-of-place patching of Grid Infrastructure (read my blog posts to know why I really love the local-mode automaton), so it is something that I definitely need in my clusters.
A choice that makes sense for Oracle and most customers
Oracle vision regarding Grid Infrastructure consists of a central management of clusters, using the Oracle Domain Services Cluster. In this kind of deployment, the Management Repository, TFA, and many other services, are centralized. All the clusters use those services remotely instead of having them configured locally. The local-mode automaton is no exception: the full, enterprise-grade version of Fleet Patching and Provisioning (FPP, formerly Rapid home provisioning or RHP) allows much more than just out-of-place patching of Grid Infrastructure, so it makes perfectly sense to avoid those configurations everywhere, if you use a Domain Cluster architecture. Read more here.
Again, as I said many times in the past, doing out-of-place patching is the best approach in my opinion, but if you keep doing in-place patching, not having the local-mode automaton is not a problem at all and the default behavior in 19c is a good thing for you.
I need local-mode automaton on 19c, what I need to do at install time?
If you have many clusters, you are not installing them by hand with the graphic interface (hopefully!). In the responseFile for 19c Grid Infrastructure installation, this is all you need to change comparing to a 18c:
Registering database with Oracle Grid Infrastructure
14% complete
Copying database files
43% complete
Creating and starting Oracle instance
45% complete
49% complete
54% complete
58% complete
62% complete
Completing Database Creation
66% complete
69% complete
71% complete
Executing Post Configuration Actions
100% complete
Database creation complete. For details check the logfiles at:
/u01/app/oracle/cfgtoollogs/dbca/_mgmtdb.
Database Information:
Global Database Name:_mgmtdb
System Identifier(SID):-MGMTDB
Look at the log file "/u01/app/oracle/cfgtoollogs/dbca/_mgmtdb/_mgmtdb2.log" for further details.
Then, configure the PDB for the cluster. Pay attention to the -local switch that is not documented (or at least it does not appear in the inline help):
Oracle PL/SQL
1
$ mgmtca -local
After that, you might check that you have the PDB for your cluster inside the MGMTDB, I’ll skip this step.
Before creating the rhpserver (local-mode automaton resource), we need the volume and filesystem to make it work (read here for more information).
Again, note that there is a -local switch that is not documented. Specifying it will create the resource as a local-mode automaton and not as a full FPP Server (or RHP Server, damn, this change of name gets me mad when I write blog posts about it 🙂 ).
HTH
—
Ludovico
This website uses cookies to improve your experience. We'll assume you're ok with this, but you can opt-out if you wish.Accept
Privacy & Cookies Policy
Privacy Overview
This website uses cookies to improve your experience while you navigate through the website. Out of these, the cookies that are categorized as necessary are stored on your browser as they are essential for the working of basic functionalities of the website. We also use third-party cookies that help us analyze and understand how you use this website. These cookies will be stored in your browser only with your consent. You also have the option to opt-out of these cookies. But opting out of some of these cookies may affect your browsing experience.
Necessary cookies are absolutely essential for the website to function properly. This category only includes cookies that ensures basic functionalities and security features of the website. These cookies do not store any personal information.
Any cookies that may not be particularly necessary for the website to function and is used specifically to collect user personal data via analytics, ads, other embedded contents are termed as non-necessary cookies. It is mandatory to procure user consent prior to running these cookies on your website.