
As I explained in the previous blog posts, from a manageability perspective, you should not change the patch level of a deployed Oracle Home, but rather install and patch a new Oracle Home.
With the same principle, Oracle Homes deployed on different hosts should have an identical patch level for the same name. For example, an Oracle Home /u01/app/oracle/product/EE12_1_0_2_BP171018 should have the same patch level on all the servers.
To guarantee the same binaries and patch levels everywhere, the simple solution that I am shoing in this series is to store copies of the Oracle Homes somewhere and use them as golden images. (Another approach, really different and cool, is used by Ilmar Kerm: he explains it here https://ilmarkerm.eu/blog/2018/05/oracle-home-management-using-ansible/ )
For this, we will use a Golden Image store (that could be a NFS share mounted on the Oracle Database servers, or a remote host accessible with scp, or other) and a metadata store.
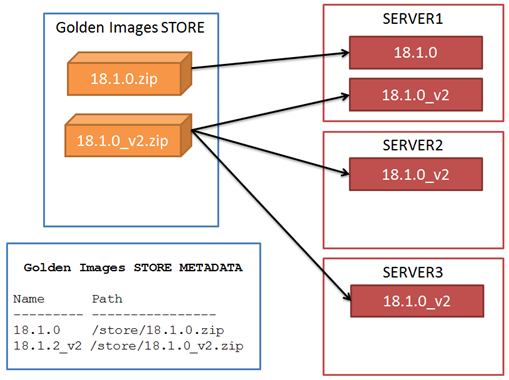 When all the software is deployed from golden images, there is the guarantee that all the Homes are equal; therefore the information about patches and bugfixes might be centralized in one place (golden image metadata).
A typical Oracle Home lifecycle:
- Install the software manually the first time
- Create automatically a golden image from the Oracle Home
- Deploy automatically the golden image on the other servers
When a new patch is needed:
- Deploy automatically the golden image to a new Oracle Home
- Patch manually (or automatically!) the new Oracle Home
- Create automatically the new golden image with the new name
- Deploy automatically the new golden image to the other servers
The script that automates this lifecycle does just two main actions:
- Automates the creation of a new golden image
- Deploys an existing image to an Oracle Home (either with a new path or the default one)
- (optional: uninstall an existing Home)
Let’s make a graphical example of the previously described steps:
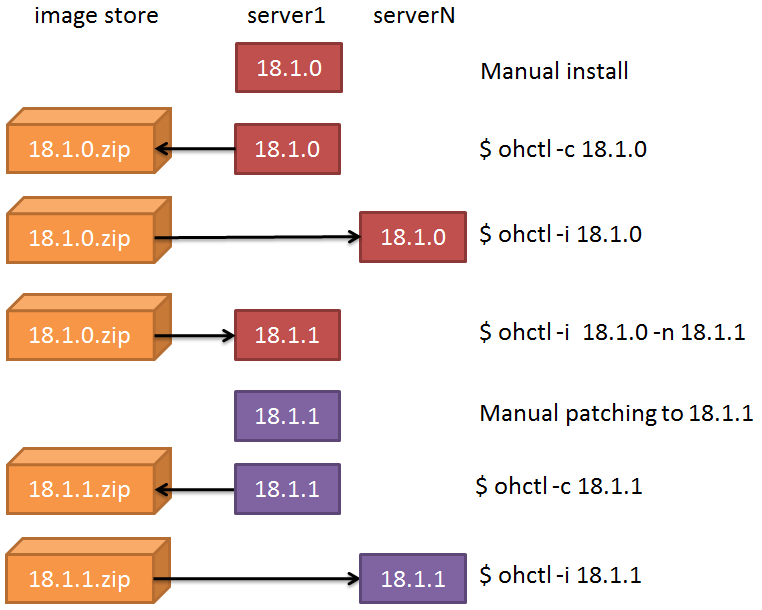 Here, the script ohctl takes two actions: -c (creates a Golden Image) and -i (installs a Golden Image)).
The create action does the following steps:
- Copies the content to a working directory
- Cleans up logs, audits, etc.
- Creates the zip file
- Stores the zip file in a shared NFS repository
- Inserts the metadata of the new golden image in a repository
The install action does the following steps:
- Checks if the image is already deployed (plus other security checks)
- Creates the new path based on the name of the image or the new name passed as argument
- Unzips the content in the new Oracle Home
- Runs the runInstaller –clone to attach the home in the central inventory and (optionally) set a new Home name
- (optionally) Relinks the oracle binary with the RAC option
- Run setasmgid if found
- Other environment-specific tasks (e.g. dealing with TNS_ADMIN links)
By following this pattern, Oracle Home names and paths are clean and the same everywhere. This facilitates the deployment and the patching.
You can find the Oracle Home cloning steps in the Oracle Database documentation:
In the next blog post I will explain parts of the ohctl source code and give some examples of how I use it (and publish a link to the full source code 🙂 )
Latest posts by Ludovico (see all)
- New views in Oracle Data Guard 23c - January 3, 2024
- New in Data Guard 21c and 23c: Automatic preparation of the primary - December 22, 2023
- Does FLASHBACK QUERY work across incarnations or after a Data Guard failover? - December 13, 2023
Pingback: Oracle Home Management – part 6: Simple Golden Image Blueprint - Ludovico Caldara - Blogs - triBLOG